HYDROS Devices can only connect to a 2.4 GHz WiFi network with the WPA/WPA2 protocol. HYDROS Devices cannot be connected to a 5 GHz network. When assessing a router that is compatible with HYDROS, please keep the following in mind:
Newer routers often will have both 2.4GHz and 5GHz bands. (The bands might use the same name or might have different names)
Older routers, or routers with just one band, are often 2.4GHz only.
HYDROS will not work with enterprise WiFi networks that have a landing page or sign-in portal, nor will it require a browser to complete the connection (e.g., hotels and trade show venues).
Which WiFi network should I connect to?
I see ONE network – If you only see one WiFi network name that belongs to you, it should be a 2.4GHz network and will work with HYDROS Devices.
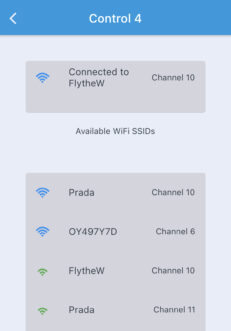
I see TWO networks—If you see two or more WiFi network names that belong to you, you probably have a 2.4GHz and 5GHz dual-band router. If so, check the names of your WiFi networks on your smartphone’s wireless settings page.
I see ZERO networks – If you do not know any WiFi network names that belong to you, you probably have a 5GHz network. If so, you must go to your router settings and enable the 2.4 GHz network.
WPA/WPA2 Protocol
Most routers use the WPA/WPA2 protocol by default. However, if you are still running into network issues after confirming you are on a 2.4GHz network, it can be helpful to verify you are on a WPA/WPA2-protected network.
HYDROS Devices need to be connected to a WPA/WPA2 protocol network. HYDROS does not support WEP because it is less secure than WPA and WPA2.
Mesh Networks
Mesh networks are the big next thing nowadays. They are great because they allow us to create a network of access points that ensures our home is fully connected and has no WiFi dead spots. They do this by connecting wireless pods to create a WiFi grid.
These devices are smart enough to switch back and forth between 2.4GHz and 5GHz networks to ensure stable connections across all pods. The problem is that when the network switches from 2.4GHz to 5GHz, it disconnects any device that is 2.4GHz-only, such as HYDROS.
To fix the problem, you can go into your mesh configuration and split the 2.4 GHz and 5 GHz networks by giving them different names. Unfortunately, some common mesh network manufacturers DO NOT allow this.
In this case, the simplest way to fix the problem is to add a third-party access point to your mesh network to create a NEW 2.4GHz-only network. There are some benefits to this setup:
One fully compatible WiFi band – Since the Access Point runs a single WiFi network, HYDROS will always have a constant and fully compatible signal to connect to. As a result, it will not have to worry about the mesh network switching over to the 5GHz network and getting disconnected.
Higher hardware quality—An access point from a reputable brand will give you peace of mind that the company and millions of other users have thoroughly tested the hardware. Internet companies’ Routers are notoriously low quality, and the WiFi is highly unreliable.
Isolated WiFi network—An access point allows you to create a WiFi network specifically for your Aquarium. Having an Aquarium-only network prevents other household devices, such as televisions, phones, cameras, computers, and many others, from overloading the network and causing it to crash.
Network Reliability – When connecting the Access Point directly to your router’s back with an Ethernet cable, you create a solid connection between the router and the Access Point. If your router’s WiFi is overwhelmed and crashes, the access point will continue to provide an internet connection to your Aquarium, as it is NOT relying on the router’s WiFi signal.
Low Cost – Access Points are relatively inexpensive and much easier to set up than installing a second router, which can cause many network problems if installed incorrectly.
They can be relatively inexpensive (~$30) and available via Amazon and your local electronics store.
They have been around for many years with thousands of positive reviews.
They are straightforward to install
Many HYDROS users have installed them successfully.
Wireless Access Point
There are two ways to connect your Netgear Access Point to your router:
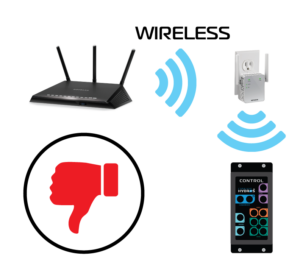
Wirelessly—The access point connects to your router wirelessly, takes the WiFi signal, and pushes it out.
PROS:
You can install it anywhere in the house. No wires are necessary.
It keeps the same WiFi network name so your devices can seamlessly switch between the router and the Access Point.
CONS:
It relies on your router’s WiFi signal to connect and provide internet to any devices connected to the access point.
The CON is a huge issue. As we explained before, routers provided by the internet company are low-quality and unreliable. If the WiFi network is overwhelmed and crashes, the connection between the router and the access point is useless. So, if you get the access point to bypass the unreliable WiFi from your router, you are back to square one!
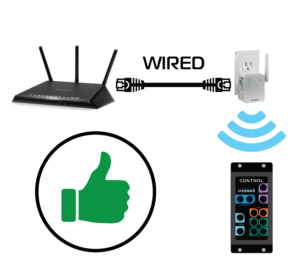
Wired (strongly recommended) – The access point directly connects to the router’s back using an Ethernet cable.
PROS:
The connection between the router and the access point is solid and DOES NOT rely on the router’s unreliable WiFi. Therefore, even if the router’s WiFi network is overwhelmed, it will not affect the Access Point connection.
You added network versatility. You can configure the access point to create only a 2.4GHz network, which you need if you have a mesh network or your router does not allow you to split the names of the 2.4GHz and 5GHz networks.
CONS:
The access point must be near the router to connect via an Ethernet cable. Unless your house is newer and has network connectors in every room, you must physically install the Access Point near the router to connect with an Ethernet cable.
The PROS outweigh the cons. Installing the Access Point adds reliability and a solid connection for your HYDROS devices.
Install the TP-Link Access Point
Step 1: Connect the Access Point to Power
Connect the Access Point to a wall outlet and allow 60 seconds for the unit to initialize fully.
TIP: A good idea is to connect your router, access point, and internet modem to a backup battery UPS. This will ensure that these crucial devices continue to work in the event of a power outage (or a breaker trip) and allow all HYDROS devices to communicate with each other.
Step 2: Hardwire the Access Point to the back of your router
If you want a strong WiFi connection, you CANNOT skip this step. If necessary, move the access point closer to the router. It does not need to be next to the tank to work.
Step 3: Download the TP-Link “Tether” app to your mobile device
Open the Tether app and follow the instructions to set up your Access Point. The application will walk you through the entire process. When you are done, you will be able to connect to your newly created WiFi.
Step 4: Change the Access Point Mode
Do NOT skip this step!
Open the Tether app and connect to your TP-Link device
From the main screen, go to the bottom-right corner and tap “More.”
Locate and tap on “Operation Mode.”
Select “Access Point Mode” and tap on Apply.
At this point, the TP-Link device will reboot.
Step 5: Modify the TP-Link WiFi Settings
Reconnect to the TP-Link device via the Tether app and go to the “More” screen.
From the “More” screen, tap on “WiFi Settings.”
Tap on the “2.4GHz Network.”
Modify the name to “Aquarium” or something different from your primary router’s WiFi name.
Please make sure you type in a WiFi password.
Tap on “Advanced” and ensure the security is encrypted.
Tap on Save.
Tap on the upper left-hand arrow to return to the previous screen.
Tap on the “5GHz Network.”
Modify the name to “Aquarium-5GHz” or something different from your primary router’s WiFi name.
Please make sure you type in a WiFi password.
Tap on “Advanced” and ensure the security is encrypted.
Tap on Save.
Step 6: Connect your HYDROS Devices
You can now close the browser window or continue editing to make changes to your configuration.
You may now run your HYDROS setup and connect to your newly created “Aquarium” WiFi network!
Install the Netgear EX3700 Access Point
Step 1: Connect the Access Point to Power
Connect the Netgear EX3700 to a wall outlet and allow 60 seconds for the unit to initialize fully.
TIP: A good idea is to connect your router, access point, and internet modem to a backup battery UPS. This will ensure that these crucial devices continue to work in the event of a power outage (or a breaker trip) and allow all HYDROS devices to communicate with each other.
Step 2: Connect to the Access Point Using Your Computer Browser
WARNING: At this time, DO NOT connect the access point to the back of your primary router. You’ll be able to do that at a later step.
Open your computer or mobile device’s internet browser and go to http://www.mywifiext.net. Ensure that your computer or mobile device is connected to your home network.
Step 3: Create an Account at Netgear
If this is your first time connecting to the Access Point, you must create a Netgear account. If you are not asked the question, please go to Step 5 below.
Step 4: Follow the Setup Wizard
Using an Ethernet cable, connect one end to the yellow Ethernet port on the side of your Netgear EX3700 and the other end to one of the open Ethernet ports on the back of your router.
TIP: After connecting the Access Point to the main router using an Ethernet cable, wait 60 seconds before proceeding to the next step.
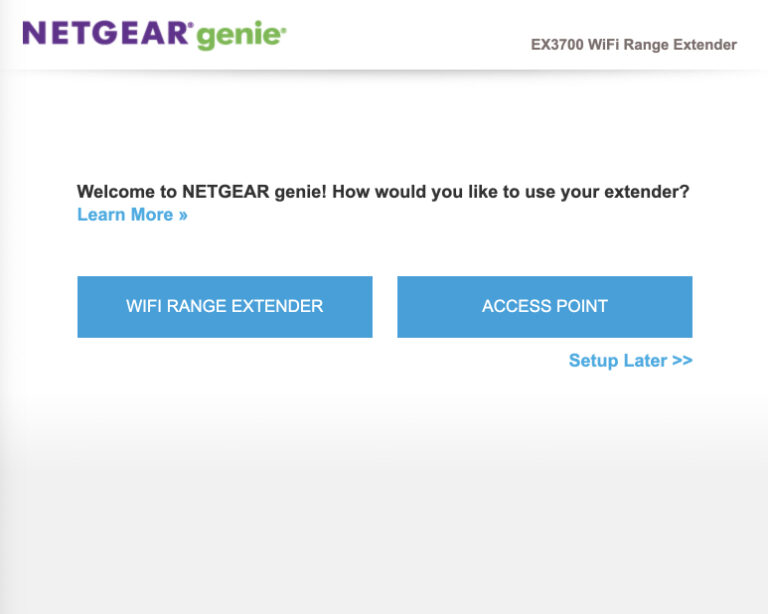
First, on the “Welcome to Netgear” screen, select “Access Point.”
Allow the Access Point to search for an internet connection. Since you are connected to the router’s back panel via an Ethernet cable, the Access Point should not have any issues finding an internet connection and proceeding to the next screen.
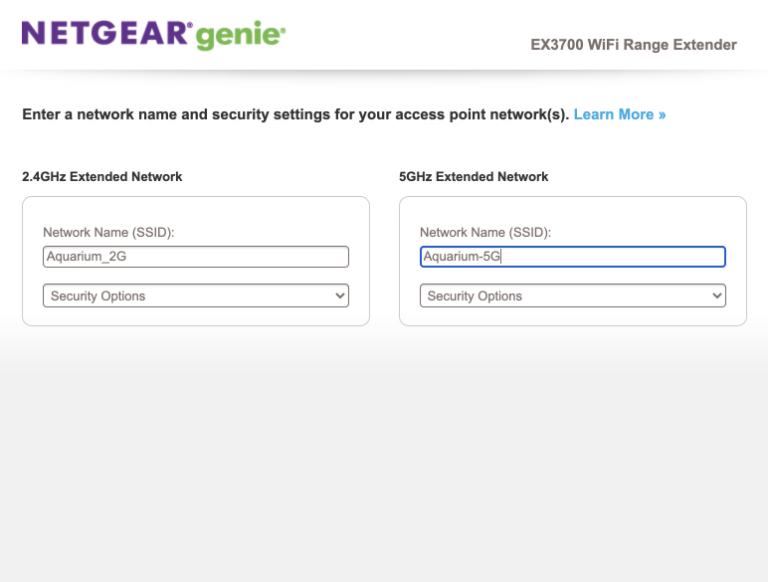
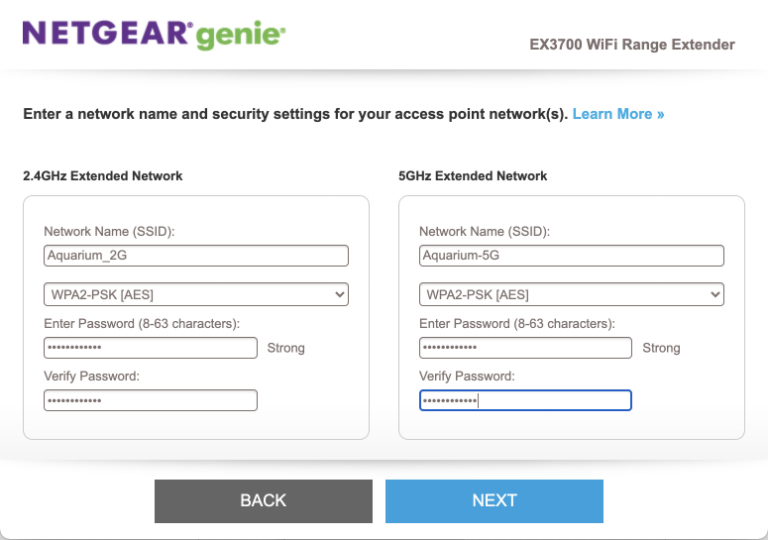
Create your new WiFi networks, but make sure both 2.4GHz and 5GHz networks have different SSIDs. It is OK to use the same password for both. We recommend calling the 2.4GHz network “Aquarium_2G” and the 5GHz network “Aquarium_5G.”
WARNING: Use a unique SSID name for your new network. Do not use the same SSID name as your other WiFi networks.
For Security Options, please select “WPA2-PSK [AES]” and enter your password. The password must be at least eight characters long.
Tap the Next button and wait for the access point to apply the settings.
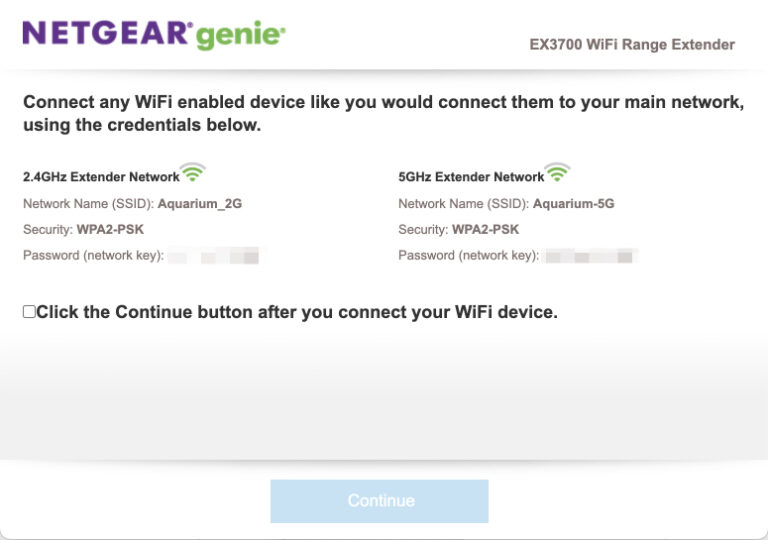
You can now close the browser window or continue editing to make changes to your configuration.
You may now run your HYDROS setup and connect to your newly created “Aquarium_2G” WiFi network!
Networking Best Practices Checklist
To ensure excellent and reliable network connectivity, please read and follow this list:
Backup Battery—The HYDROS system relies on your WiFi network to be operational. Putting your modem, router, and access points (if you have one) on a backup battery will ensure reliable internet and WiFi even during a power outage. Think about it: there isn’t much to do when the power is out. It would be nice to browse the internet or watch a TV show without using up all your cellular data!
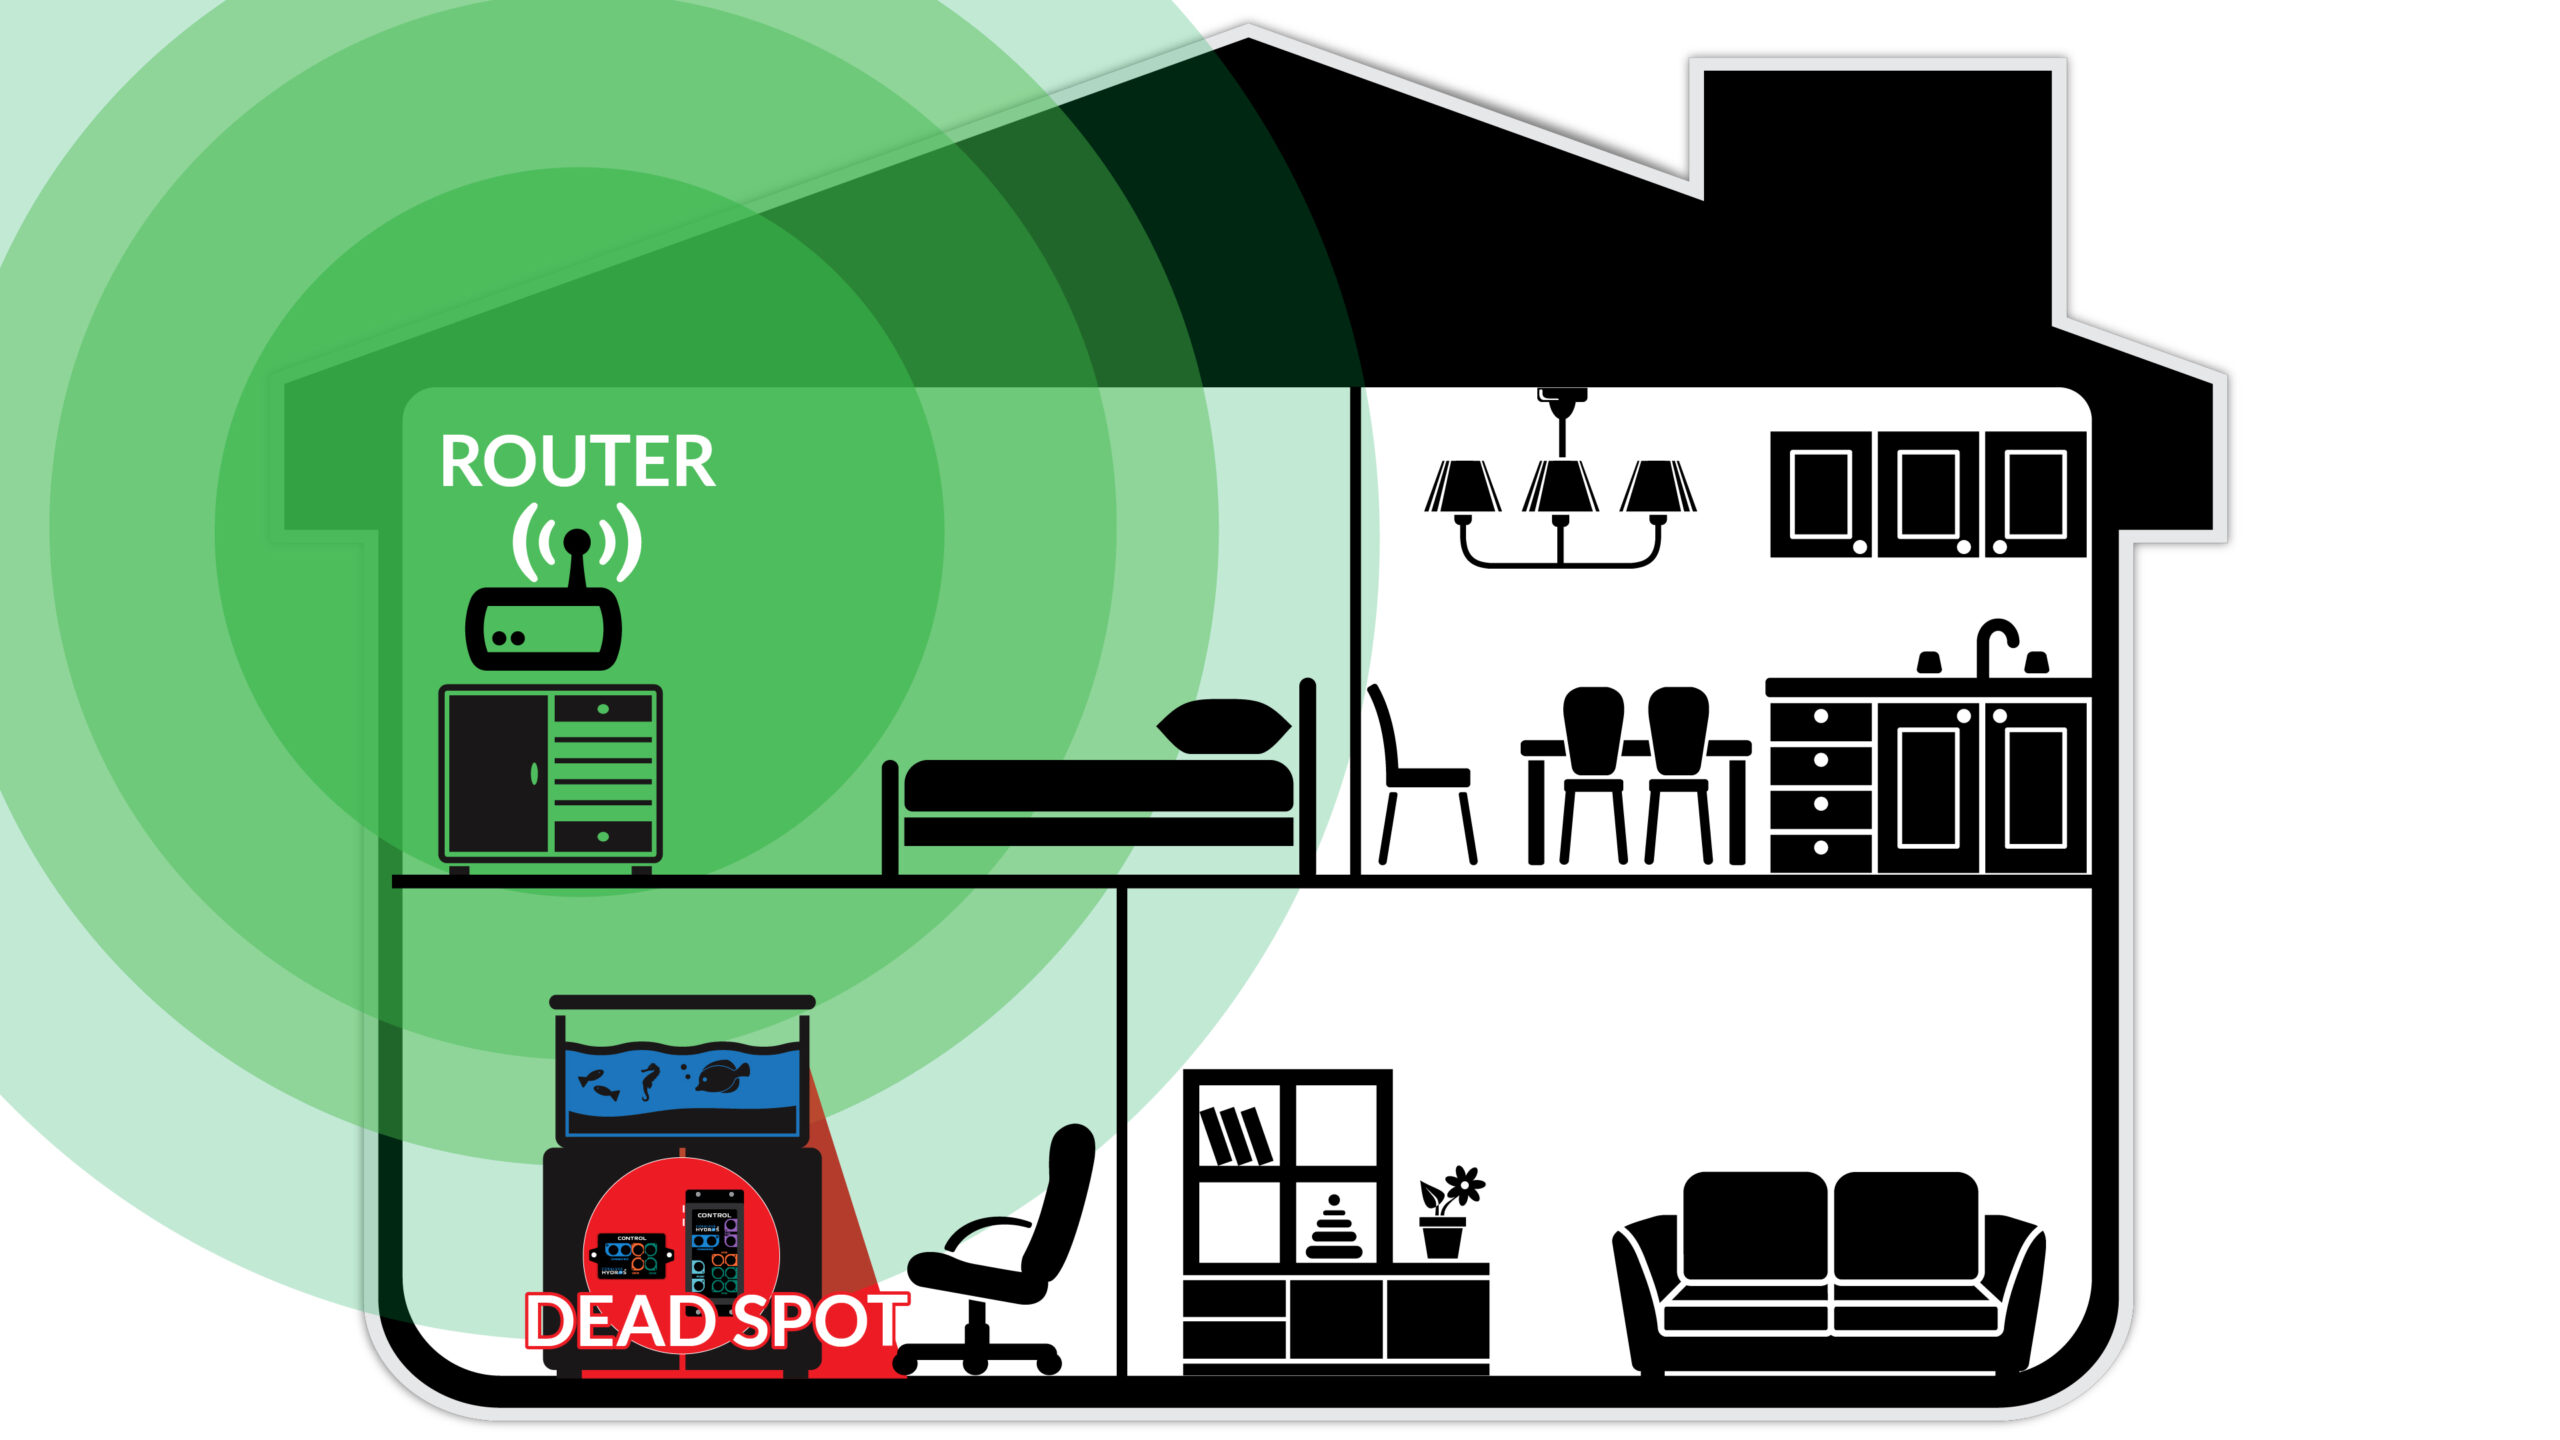
WiFi Line of Sight (WiFi CANNOT travel through water)—When installing HYDROS devices, remember that WiFi CANNOT travel through water. Therefore, if you draw a straight line between your HYDROS and your router, there SHOULD NOT be any body of water in the path. If there is, WiFi will not get through the water, creating a dead spot behind the body of water.
WiFi originates from a single source (the router), with the HYDROS controller located beneath the aquarium. The aquarium obstructs the WiFi signal, leading to a dead zone that causes intermittent or lost connectivity.
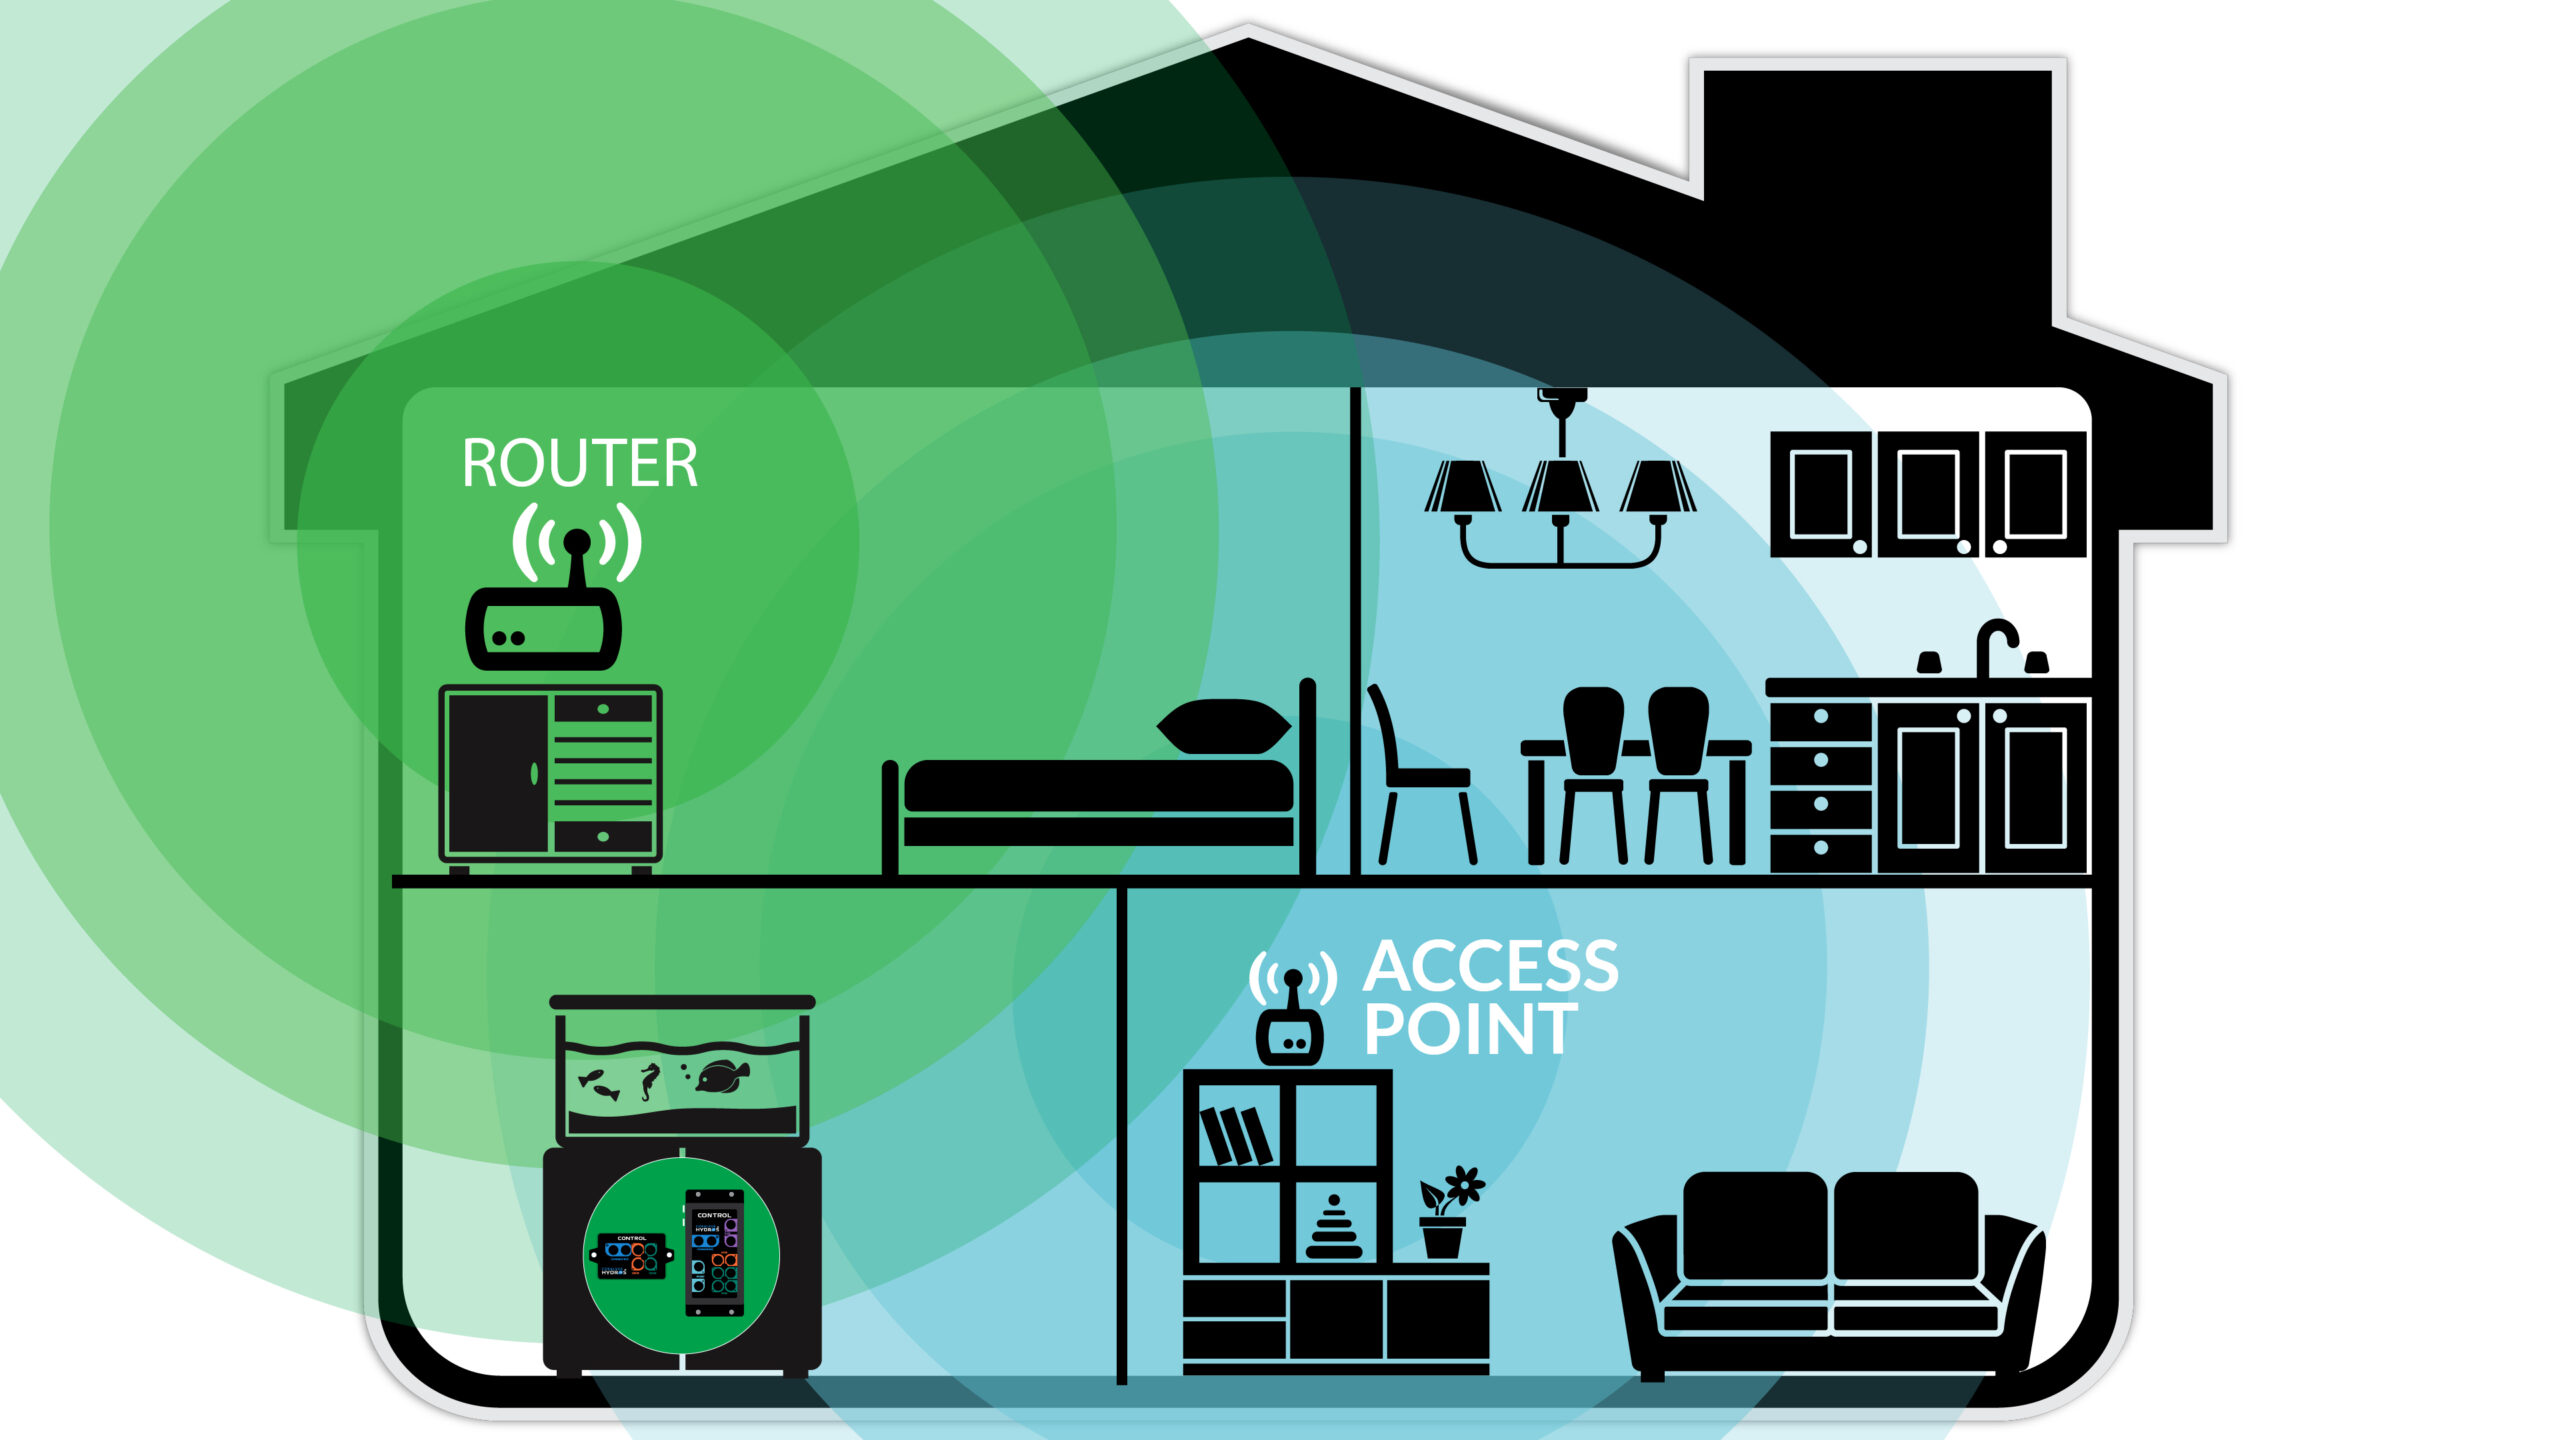
The WiFi signal originates from two sources. While the aquarium water blocks the router’s signal, HYDROS still has a direct line of sight to the living room access point, ensuring no HYDROS WiFi connectivity issues.
Split your WiFi Bands – Some connectivity issues can be caused by your router using the same SSID for both the 2.4GHz and 5GHz bands. To add better connectivity and reliability, we recommend splitting the bands. Create separate SSIDs for each band.
Dedicated WiFi for Aquarium – As our household becomes cluttered with products that require an internet connection, a WiFi network can become overloaded. Routers only have a limited number of WiFi slots. Adding an Access Point dedicated to WiFi for your Aquarium ensures the WiFi network is never overloaded.
Purchase Your Router – It is widely accepted that the equipment provided by an Internet Service Provider (ISP) is not of the highest quality. Therefore, replacing their router with your own will ensure higher performance and reliability.
Two Routers are NOT Better than One – People often try to save money by using an old router to create an access point. Unless the 2nd router is correctly configured as an AP, it WILL cause many problems on your home network. It is like having two police officers independently directing traffic at the same intersection. It creates confusion and connectivity issues. Purchasing an Access Point designed to work in a network with an existing router is best.