Add Light (LED)
Lighting is an integral part of the Aquarium experience, and sometimes, it is required by some of the inhabitants of our aquariums.
Here is what you’ll need to get started:
- A lighting fixture connected to a HYDROS device with an AC outlet.
- Optional: Temperature Sensor
TIP: You can use the same temperature sensor to monitor the aquarium water temperature. You do not need a separate sensor for the lights. If you have not configured your water sensor input, please follow the instructions
here.
Step 1: Create the Light Output
- From the STATUS screen on your HYDROS app, top on the three horizontal dots to the right of the OUTPUTS label and select “Add / Edit Output.”
- Tap on the “+” symbol at the bottom right of the page
- Type in the name of your new output and then tap “Create.”
Step 2: Configure your Light Output
- Family: Simple Lights
- Type: Select the type of light you are using.
- Use External Schedule (advanced): You can create a simple or complex schedule to run the lights.
- Used In Schedule: This is a list of all external Light Schedules used by this output. This option will only be displayed if “Use External Schedule” is turned off.
- Start Time: The time at which the light will turn ON.
- End Time: The time light will turn OFF.
- Output Device: Here, you select the location of your Light Fixture. You can select from multiple options such as AC Outlet, Drive Port, or 0-10V Output.
- Overheat Input: Here, you select the Temperature Sensor input.
TIP: To see a list of all inputs available on MULTIPLE devices, you must first
create a Collective. Otherwise, only inputs on the same device will show.
- Overheat Temperature: You select the temperature at which you want the Control to turn your Light Fixture OFF.
- If Input Unavailable: It allows you to specify what the output should do if the input sensor becomes unavailable.
WARNING: If using a WiFi strip or WiFi outlet, this is NOT a “fallback” state. If you are using an XP8 or a Drive Port, it IS the “fallback” state.
- Power Safe Range: You can specify an “acceptable” power use range. If power consumption is outside the range, a notification will trigger if selected.
WARNING: This option is NOT available if the “Output Device” is assigned to an outlet that cannot monitor power, such as a WiFi Strip outlet.
- Power Notification Level: You can select the notification level that triggers if the power consumption falls outside the “Power Safe Range.”
WARNING: This option is NOT available if the “Output Device” is assigned to an outlet that cannot monitor power, such as a WiFi Strip outlet.
- Active Modes: This allows you to choose which modes this output will be operational and which modes should turn OFF.
- Depends On: This feature allows you to turn the output based on the status of another output. To enable, select from the list of available outputs.
- Dependency Mode: You can either turn the output ON or OFF based on the other output.
- OFF if OFF: Will turn the current output OFF if the output it depends on is OFF
- OFF if ON: Will turn the current output OFF when the output it depends on is ON
- ON if OFF: Will turn the current output ON when the output it depends on is OFF
- ON if ON: Will turn the current output ON when the output it depends on is ON
- Use Advanced Settings: If you are an expert, this feature will allow you to tweak the output default settings to suit your system better. See Appendix A below for more details.
Step 3: Save
- Upload your changes to the cloud
Step 4: Create Light Schedule
Now that you have created a Light Output, create a Light Schedule to run the light the way you want it!
Appendix A: Controlled by Light Schedule Settings
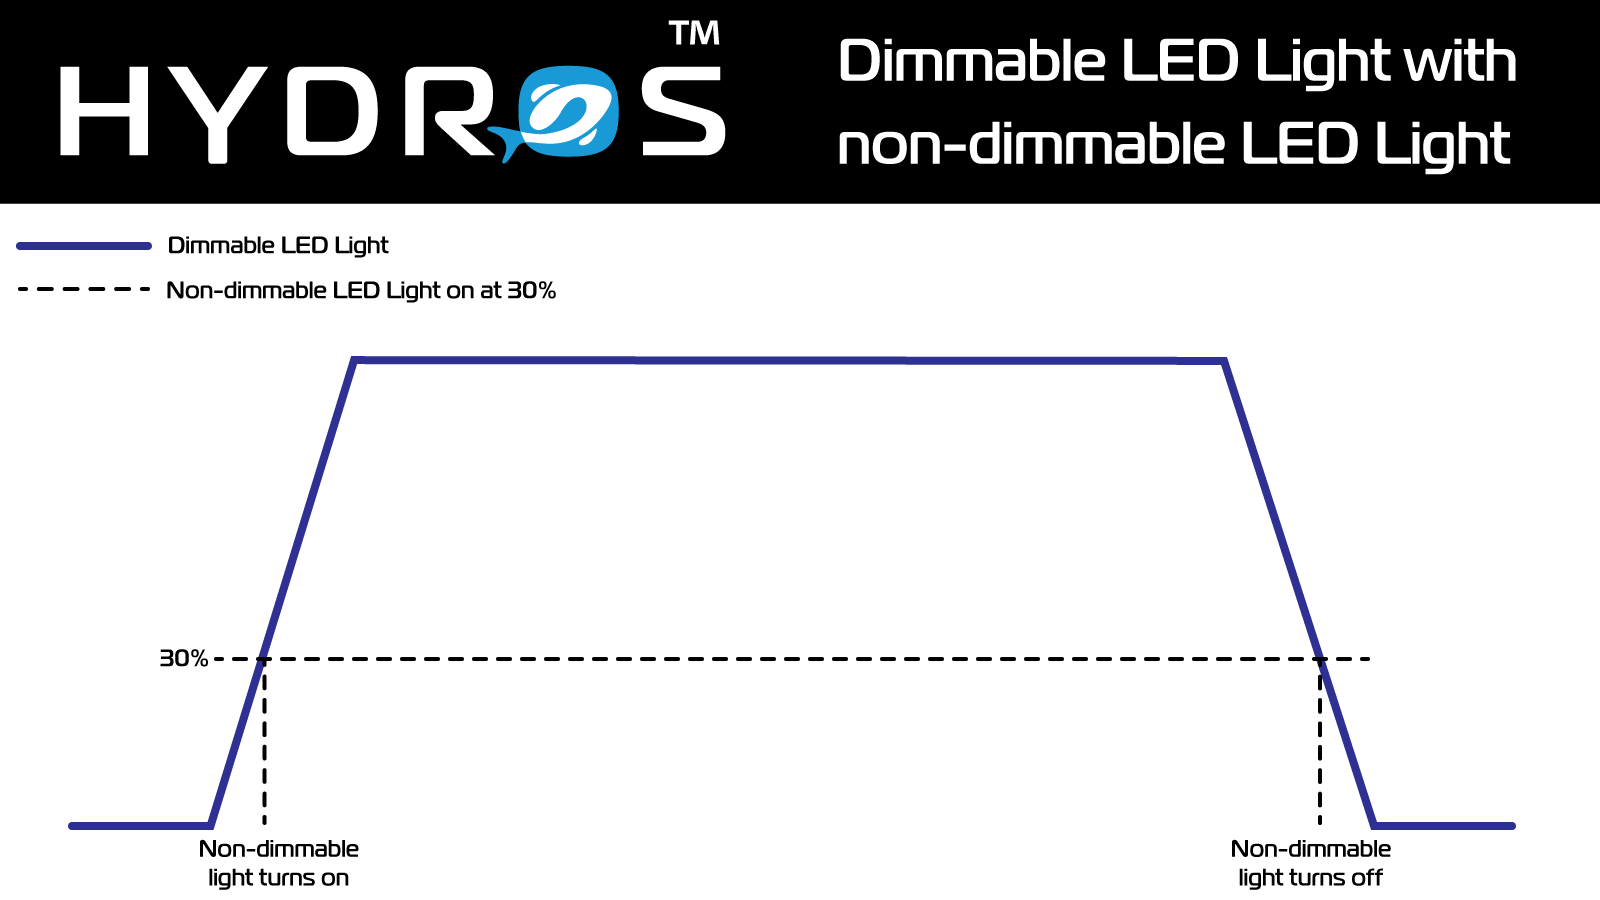
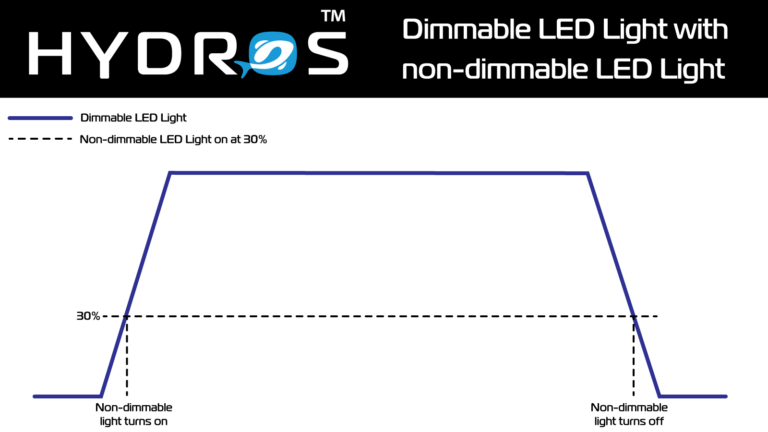
- On When Schedule Level Above: This field specifies the intensity in the “Schedule” the output will turn ON.
TIP: Say you set this to 30%. This means that the light will turn on ONLY AFTER the schedule has reached 30% for any schedule that uses this light.
- Overheat Input: Select a temperature sensor to trigger the light to turn OFF if the temperature exceeds your defined max temp.
- Overheat Temperature: Set the maximum temperature before the unit shuts OFF.
- If Input Unavailable: This allows you to specify how the outlet should act if the sensor is not found or missing
- Minimum OFF Time: This allows you to specify what is the minimum time the outlet should be OFF
- Maximum OFF Time: This allows you to specify what is the maximum time the outlet should be OFF
- Minimum ON Time: This allows you to specify what is the minimum time the outlet should be ON
- Maximum ON Time: This allows you to specify what ist the maximum time the outlet should be ON
- Run Past Max ON time: This allows you to specify if you want the outlet to remain ON even if the “Max ON Time” has been exceeded
- Notification Level: This allows you to specify the level of notification you want when any of the advanced settings have been exceeded
TIP: You will get notifications when one or more advanced settings are exceeded. If you set Notification Level to NONE, the particular outlet you configured will not send you notifications.
Rename Output & Change Icon
- From the STATUS screen, tap on the Output you wish to modify.
- On the popup, tap on the “Gear” icon on the bottom right.
- From the Output setup page, tap on the “Pencil” icon on the top left.
- Type in the new name you wish
- If you wish to change the default icon, tap “Change Icon.”