HYDROS Online Manual HYDROS Control Add Lighting Schedule

Add Lighting Schedule

Want to have the HYDROS turn on your lights in the morning and then turn them off in the evening?  Do you have dimmable lights?  Want the HYDROS control to change the intensity?

Things to remember about Lighting Schedules:

  • You CAN have overlapping lighting schedules
  • When two schedules overlap, HYDROS will give priority to the schedule with the higher intensity.  
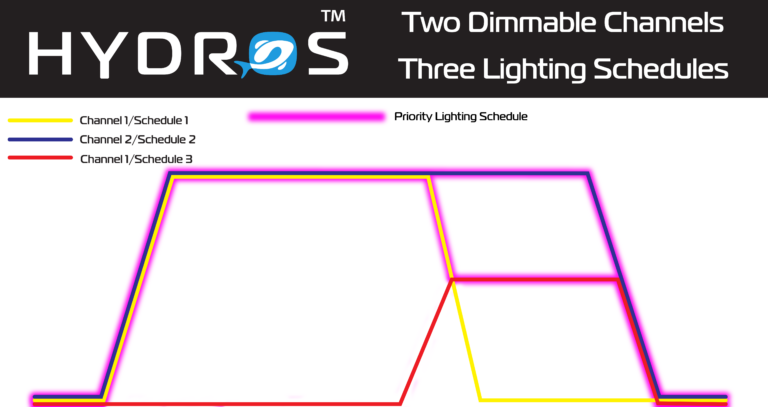
EXAMPLE: A single light with 2 channels (White + Blue).  You can run the lights very white on the first half of the day (to get high PAR values and give corals the necessary energy needed) and reduce the whites by 50% on the second half of the day to give your aquarium a more pleasing blue color.  To accomplish this simple yet efficient schedule, you must create 3 schedules.    

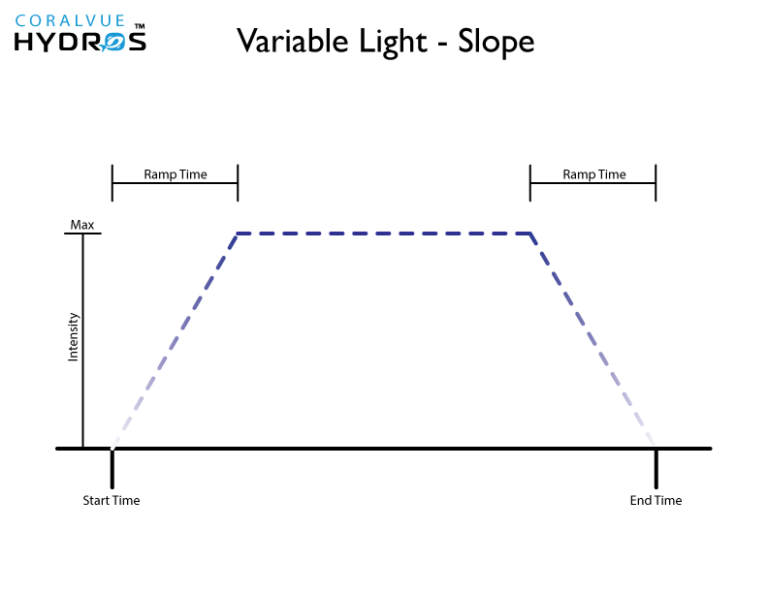
  1. Schedule 1 will run Channel 1 (White) at 100% from 9 am to 3 pm, including a 30 min ramp and dim period.  
  2. Schedule 2 will run Channel 2 (Blue) at 100 % from 9 am to 9 pm, including a 30 min ramp and dim period.
  3. Schedule 3 will run Channel 1 (White) at 50% from 2:30 pm to 9 pm, including a 30 min ramp and dim period.
  • At 9 am, both Schedules 1 and 2 will ramp Channels 1 and 2 to 100%.
  • At 2:30 pm, Schedule 1 will begin to dim Channel 1.  Simultaneously, Schedule 3 starts to ramp up Channel 1.  However, HYDROS will give Schedule 1 priority since it calls for Channel 1 to run at a higher intensity.
  • At 2:45 pm, both Schedule 1 and Schedule 3 reach the 50% intensity mark.  
  • At 2:46 pm, Schedule 3 remains at 50%, while Schedule 1 reduces to 49%.  At this time, HYDROS will give Schedule 3 priority since it is running Channel 1 at a higher intensity. (Channel 1 will remain at 50% intensity)
  • At 8:30 pm, Schedule 2 will begin to dim Channel 2.
  • At 8:45 pm, Schedule 3 will begin to dim Channel 1 while Schedule 2 continues to dim Channel 2.
  • At 9:00 pm, both Schedule 2 and Schedule 3 reach 0%.

Step 1: Create a Light Schedule

  1. From the main menu, tap on “SCHEDULES.”
  2. Tap on the + symbol at the bottom right and enter your Presets name.
  3. Tap Create

Step 2: Configure the Light Schedule

  • Type: Select “Light Schedule”
  • Variable Light Mode: Here, you can select how the light will ramp up and dim down.  In essence, you select what type of curve you will be using!
    • Slope: The light ramps up from minimum to maximum intensity for a pre-determined amount of time, remains at maximum intensity for a predetermined time, and finally dims down from maximum to minimum intensity.  
      • Start Time: The time the light starts to ramp up from Minimum intensity
      • End Time: The time the light reaches Minimum intensity at the end of the entire interval
      • Slope: The time it takes for the light to ramp up and dim down.
    • Parabola: The light will slowly ramp up from Minimum to Maximum intensity, and then, immediately after reaching Maximum intensity, it will begin to dim down back to Minimum intensity.
      • Start Time: The time the light starts to ramp up from Minimum intensity
      • End Time: The time the light reaches Minimum intensity at the end of the entire interval
    • Latitude: Set your daylight interval to relatively match that of any location in the world.   i.e., If in Fiji, the sun rises at 7 am, and the sunset is at 8 pm, then your start time will be 7 am (YOUR local time zone), and the end time will be at 8 pm (YOUR local time zone).
  • Min Level: This percentage is related to the minimum intensity the light can run specified in the light output.  
    TIP: 1% here means the minimum intensity specified in the lighting output.  If you set the lighting output to run only at 25% or more, 1% means to run the light  at the minimum allowed intensity which equals 25%
  • Max Level: This is the maximum intensity the HYDOS will run your light fixture.
    TIP: 100% here means the maximum intensity specified in the lighting output.  If you set the lighting output to run only at a maximum of 75%, it means that when you set this to 100%, it will run the light at the maximum allowed intensity of 75%.
  • Enable Advanced Settings: Please refer to Appendix A below for more details.
  • Light Count: Slide left to right to select the number of light outputs you want to attach to this schedule.
    TIP: The Light Count is not a dropdown field.  It is a slider.  To change the number of Lights, place your finger on the blue number and slide left or right to decrease or increase Lights.
  • Light #: Select the output Lights you want to run on this schedule.  
    WARNING: If your lights are not listed, please go to the Light Output and enable “Controlled by Light Scheduler”
     
  • Active Modes: This allows you to select in which modes the output will be active.
  • Run every N Days: If you wish to run the pattern every other day or every Nth number of days.  When a number is greater than 1, the app will automatically show you the first day of the cycle.  
  • Run on Days of Week – This option allows you to select which days of the week you want the schedule to run.
  • Depends On – This feature allows you to turn the schedule based on the status of another output.  To enable, select from the list of available outputs.  
    • Dependency Mode: This allows you to either turn the schedule ON or OFF based on the other output.
      • OFF if OFF: Will turn the schedule OFF if the output it depends on is OFF
      • OFF if ON: Will turn the schedule OFF when the output it depends on is ON
      • ON if OFF: Will turn the schedule ON when the output it depends on is OFF
      • ON if ON: Will turn the schedule ON when the output it depends on is ON

Appendix A: Advanced Lighting Schedule

In some instances, you can create repeating schedules where the output will turn on for a certain amount of time, then turn off and then repeat.  We call this a repeating schedule.   A good example is if you want something to run for 10 minutes once every hour.

  • Starting Time of Day – It specifies the starting time of the schedule
    EXAMPLE: If you want the output to turn ON at 8 am, STARTING TIME OF DAY = 08:00.  If you want the output to turn ON at midnight, then STARTING TIME OF DAY = 00:00
  • Run Time (How long will the output stay ON) – This specifies HOW LONG a selected output will run
    EXAMPLE: If you want the output to turn ON for 10 minutes, every hour, then your RUN TIME = 10 min
  • Run Count (How many times should it repeat?) – This specifies HOW MANY TIMES the “RUN INTERVAL” will consecutively repeat
    EXAMPLE: If you want the outlet to turn ON for 10 minutes, every hour, from 8 am to 10 pm, then your RUN COUNT = 14
  • Run Interval (How often do you want the interval to repeat) – This is the sum of the RUN TIME, plus the OFF time BEFORE it repeats itself
    EXAMPLE: If you want the output to turn ON for 10 minutes, every hour, then your RUN INTERVAL = 60 min

Zenith (Solar Altitude): Here, you can specify the sun’s angle related to the horizon.  At 90 degrees, the sun is right above your head.  


TIP: Solar altitude is the sun’s angle relative to the Earth’s horizon and is measured in degrees. The altitude is zero at sunrise and sunset and can reach a maximum of 90 degrees (directly overhead) at noon at latitudes near the equator.

Step 3: Save

  • Upload your changes to the cloud