HYDROS Control devices form a single entity where all devices share INPUTS and OUTPUTS.
This sophisticated automation system builds a web to monitor and control equipment like water level sensors, ATO pumps, and other devices.
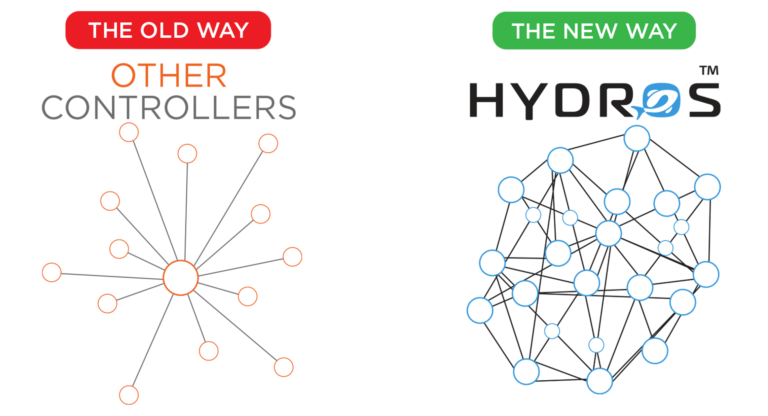
A HYDROS automation system uses a distributed web to monitor and control equipment for your aquatic environment. We call it our HYDROS Safety Net. Unlike other automated systems, HYDROS Control can withstand communication issues and handle critical situations when a device is removed or shut down!
Other Controller: One brain with multiple modules cannot function without the brain. If the brain fails, the entire system is down. HYDROS: All Control units are brains. If one fails, the others will automatically take over the tasks and keep your aquarium running.
The benefits of creating a collective are:
Redundancy – If one of the devices were to fail, all other devices would pick up the slack and keep the system going
Expandability – If you need to add more INPUTS or OUTPUTS, you can add a new HYDROS device to expand the Collective without purchasing all new hardware.
One Configuration – All devices in the Collective run the same code. It is effortless to replace a device without reprogramming the entire Collective.
Redundant WiFi Master – One device automatically acts as a WiFi Master and will take control of all WiFi strips, BUT if that device were to fail, another device will setup up and take over controlling the WiFi strips until the main WiFi master returns
Single Interface – Run multiple HYDROS units from a single interface with a single STATUS Screen and list of INPUTS and OUTPUTS
If you have multiple HYDROS Control units on the same system, it is highly recommended that you run a Collective.
Command Bus Ports
Members must be connected by wires via the Command Bus port for the Collective to work. You need to connect a device to a collective to work, but if you want it to share INPUTS and OUTPUTS with collective members, it must be connected via wired and made part of the Collective HYDROS app.
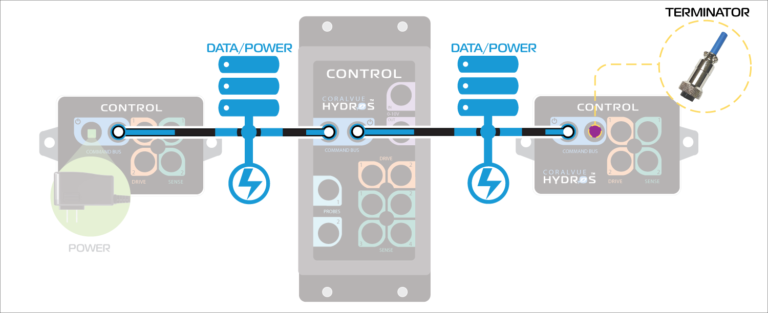
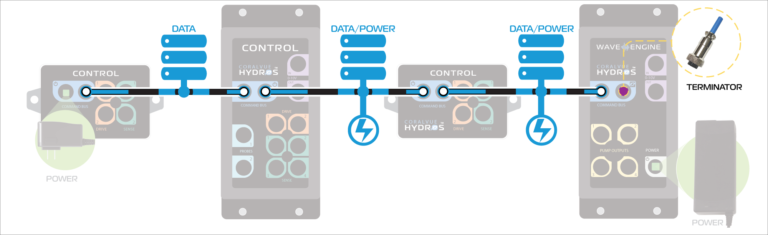
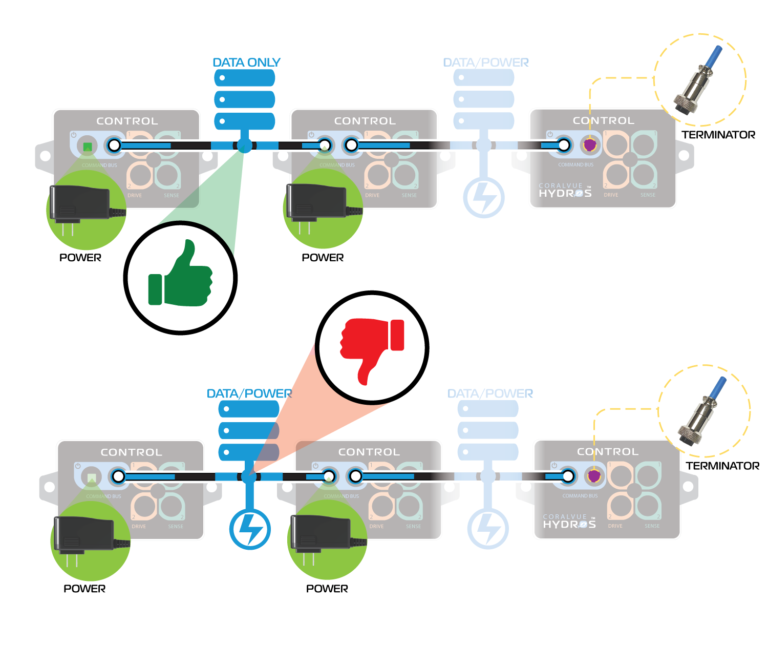
The first is a standard data+power cable called the HYDROS Command Bus Cable. This cable can transfer data and power from one HYDROS Control device to another. The cables come in standard 6-foot lengths and the upcoming 15-foot cord. An ample is to connect one HYDROS Control 2 to its power supply but then power a HYDROS Control 4 and a HYDROS Control 2 by connecting them via the command bus ports.
In the figure above, you will notice that only Control 2 on the left has a power supply, as both units share the power supply via the Command Bus port using the HYDROS Command Bus Cable. Also, take note of the Terminator on the right side. Please see the Terminator section below for more info.
WARNING: Never ADD a device to live and powered Collective. If you disconnect a device to move it, be sure to power down your entire Collective, then connect the new device and power up the Collective. It will prevent any possible damage to the command bus ports by inserting a “hot” command bus cable.
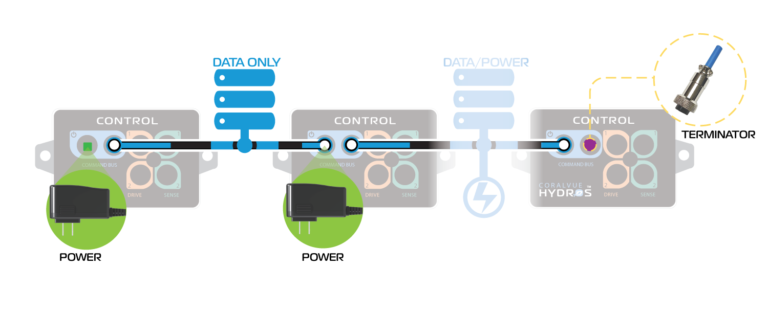
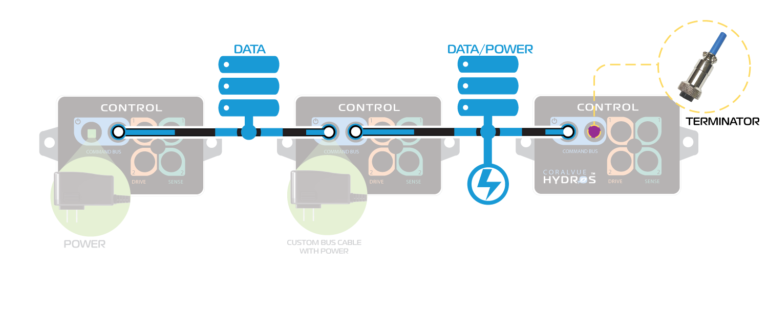
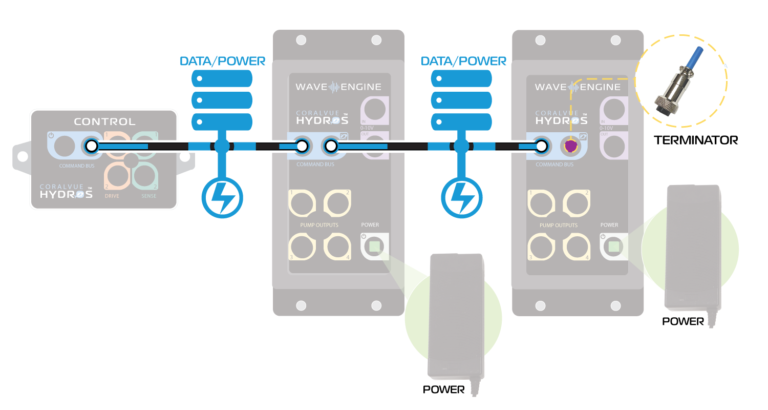
The second cable is a Data-ONLY cable that can only transfer data but NOT power, as the name says. This cable is needed to connect 2 HYDROS Control devices more than 15 feet apart. When unplugging this cable, you must add a power supply to both connected devices. However, it has the bonus of adding power redundancy.
A collective where two of the three controllers have their power supply. This scenario is possible ONLY because the two controllers with power supplies are connected with a DATA-Only Command Bus cable.
Terminators
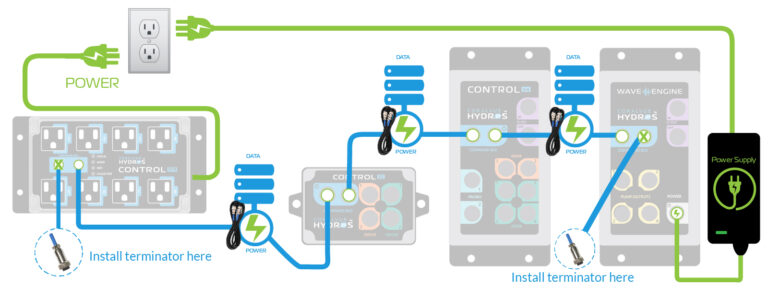
For a HYDROS Collective to work correctly, you must install at least 1 Command Bus Terminator (preferably 2) on either end of the Collective. You must install the Command Bus Terminator in at least ONE of the open Command Bus Ports on any devices that make up the Collective. For example, if you have a HYDROS Control 4 and a HYDROS Control 2 connected, you must add a Terminator to the open Command Bus Port on one of the units. If the power supply is connected to the HYDROS 4, connect the Terminator to the available port on HYDROS Control 2.
In the figure above, you can see that the Terminator must be installed in a collective. It can be installed on any of the open Command Bus ports. A terminator is needed to connect the units regardless of the command bus cable.
WARNING: All Collectives must have at least ONE Terminator installed. If not, the Collective will not work. Here is an image of the Collective when a terminator is NOT installed.
If you have a broken collective issue, please refer to the “Troubleshooting” section at the end of this page.
Redundant Power Supplies
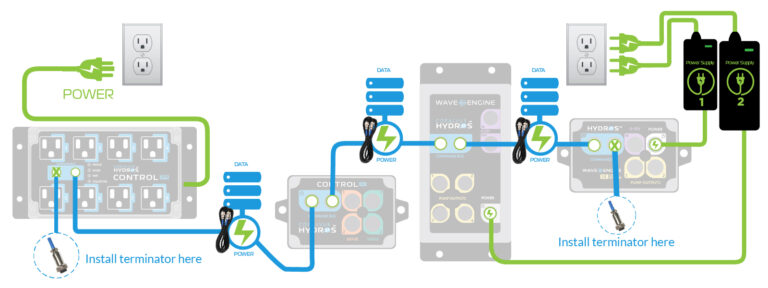
Multiple power supplies are required when you have two devices more than 15 feet apart, but you can also use this method to add redundant power supplies to a collective, even if the devices are next to each other. By connecting two HYDROS devices with a data-ONLY cable, you end up with two devices on the same Collective with their power supply. If one power supply fails, it will not affect your entire Collective. Instead, the Control unit with its power supply will remain on and take over, controlling all WiFi outlets and running your system.
Figure A shows a Collective where the two devices on the right share one single power supply. The unit on the left is considered a power island by itself. If the power supply in the middle fails, it will only take down the two devices on the right. The system will continue to run with the device on the left.
Figure A
Figure B shows a Collective where the three devices on the right share a single power supply. The unit on the l ft is considered a power island by itself. If the power supply on the left fails, it will only take the Controller on the left. The other three controllers on the right will continue to run and take over the Controller’s functions.
Figure B
In Figure C, a Collective with multiple WaveEngines. If one of the power supplies fails, it will only bring down the WaveEngine directly attached to the bottom right corner. The Collective will maintain power with the second power supply.
Figure C
In Figure D, a Collective with a WaveEngines and a Control XP8. If the WaveEngine power supply fails, it will only bring down the four pumps attached to the WaveEngine. Therefore, the Collective will maintain the power obtained from the XP8.
Figure D
TIP: The power supply on the XP8, Kraken, XD, Sole, X10, WaveEngine (v1/v2/LE) is isolated from the bus ports. Therefore, they can safely connect with data/power command bus cables! There is no need for a “data-only” command bus cable.
Figure E shows a collective with a WaveEngine, a WaveEngine LE, a Control X2, and a Control XP8. If the power supply on the WaveEngine fails, only the four pumps attached will stop working. All other devices will continue to work as they get power from the WaveEngine LE or the XP8. If the WaveEngine LE power supply fails, only the two pumps attached will stop.
TIP: As with the previous example, XP8, Kraken, XD, Sole, X10, WaveEngine (v1/v2/LE) have power isolation from the bus. You can safely connect them using a “data/power” command bus cable, creating the ultimate power redundancy setup!
Multiple Power Supplies WITHOUT DATA-Only Cable (Big NO NO!)
If you have two HYDROS Control (not XP8, Kraken, XD, Sole, X10, WaveEngine v1/v2/LE) devices connected using a data+power cable, you CAN NOT have each device connected to its power supply. Since the connection between the two units is power & data, both power supplies will power both devices, resulting in one power supply burning out.
Create a new Collective and add your FIRST device
Here is what you’ll need to get started:
Any Hydros Control or WaveEngine V2 (WaveEngineLE or WaveEngine V1 CAN NOT be the first device of a collective)
Ensure the device is already connected to the cloud, configured, AND running the latest firmware version.
WARNING: A HYDROS WaveEngine (v1) CAN NOT be the first device on your Collective. It can only be added to an already existing Collective. The IceCap Dual Pump WiFi Controller is NOT compatible with the HYDROS Collective.
A full backup of your Control unit. Please refer to our Backup and Restore page for instructions on backup your configuration.
Step 1: Connect to your Primary Control
TIP: When creating a NEW collective, the first device is your master device, and all settings and configurations WILL transfer to the Collective.
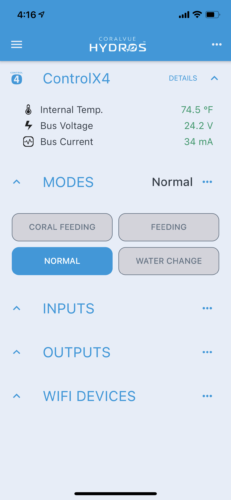
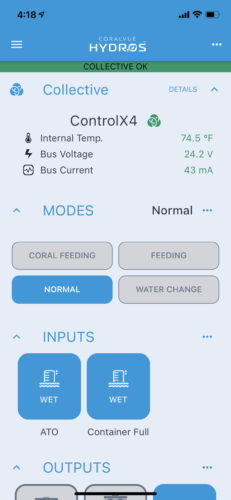
Connect to your main Control unit using the HYDROS app and go to the STATUS screen.
Step 2: Create the NEW Collective
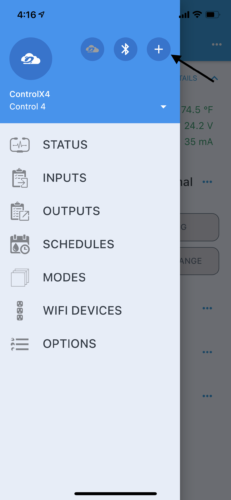
ON the STATUS screen, tap on the upper left-hand corner and tap on the “+” symbol.
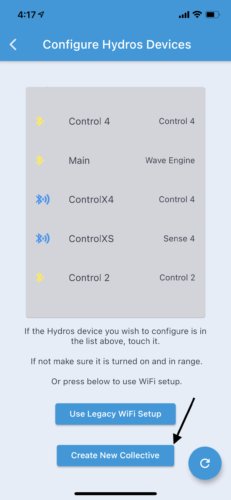
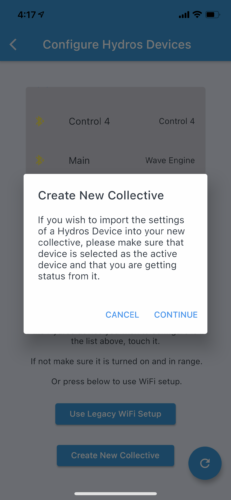
“Configure Hydros Devices,” scroll down, and tap “Create New Collective.”
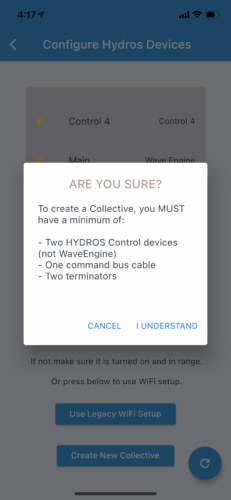
Confirm that you have connected at least two HYDROS devices using a Command Bus cable and a terminator.
Confirm that you did connect to the main Controller you wish to import into the NEW Collective.
Confirming that you connected to your main Controller first, tap on “Continue.”
WARNING: If the Controller’s name is not listed, Cancel and start again from Step 1: Connect to Your Primary Control.
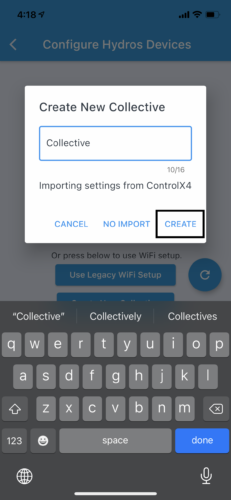
Type the name of your NEW Collective and tap on “Create.”
WARNING: Be sure to call your Collective something DIFFERENT than your primary device in Step 1. Otherwise, if you do, you will have issues.
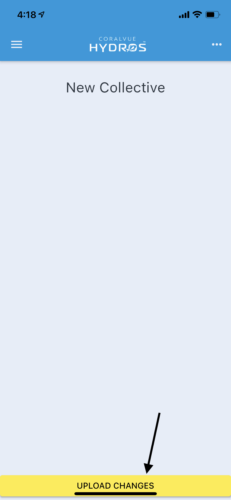
Tap on UPLOAD CHANGES to save.
Step 3: Verify the Collective
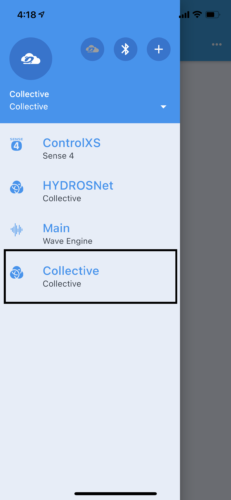
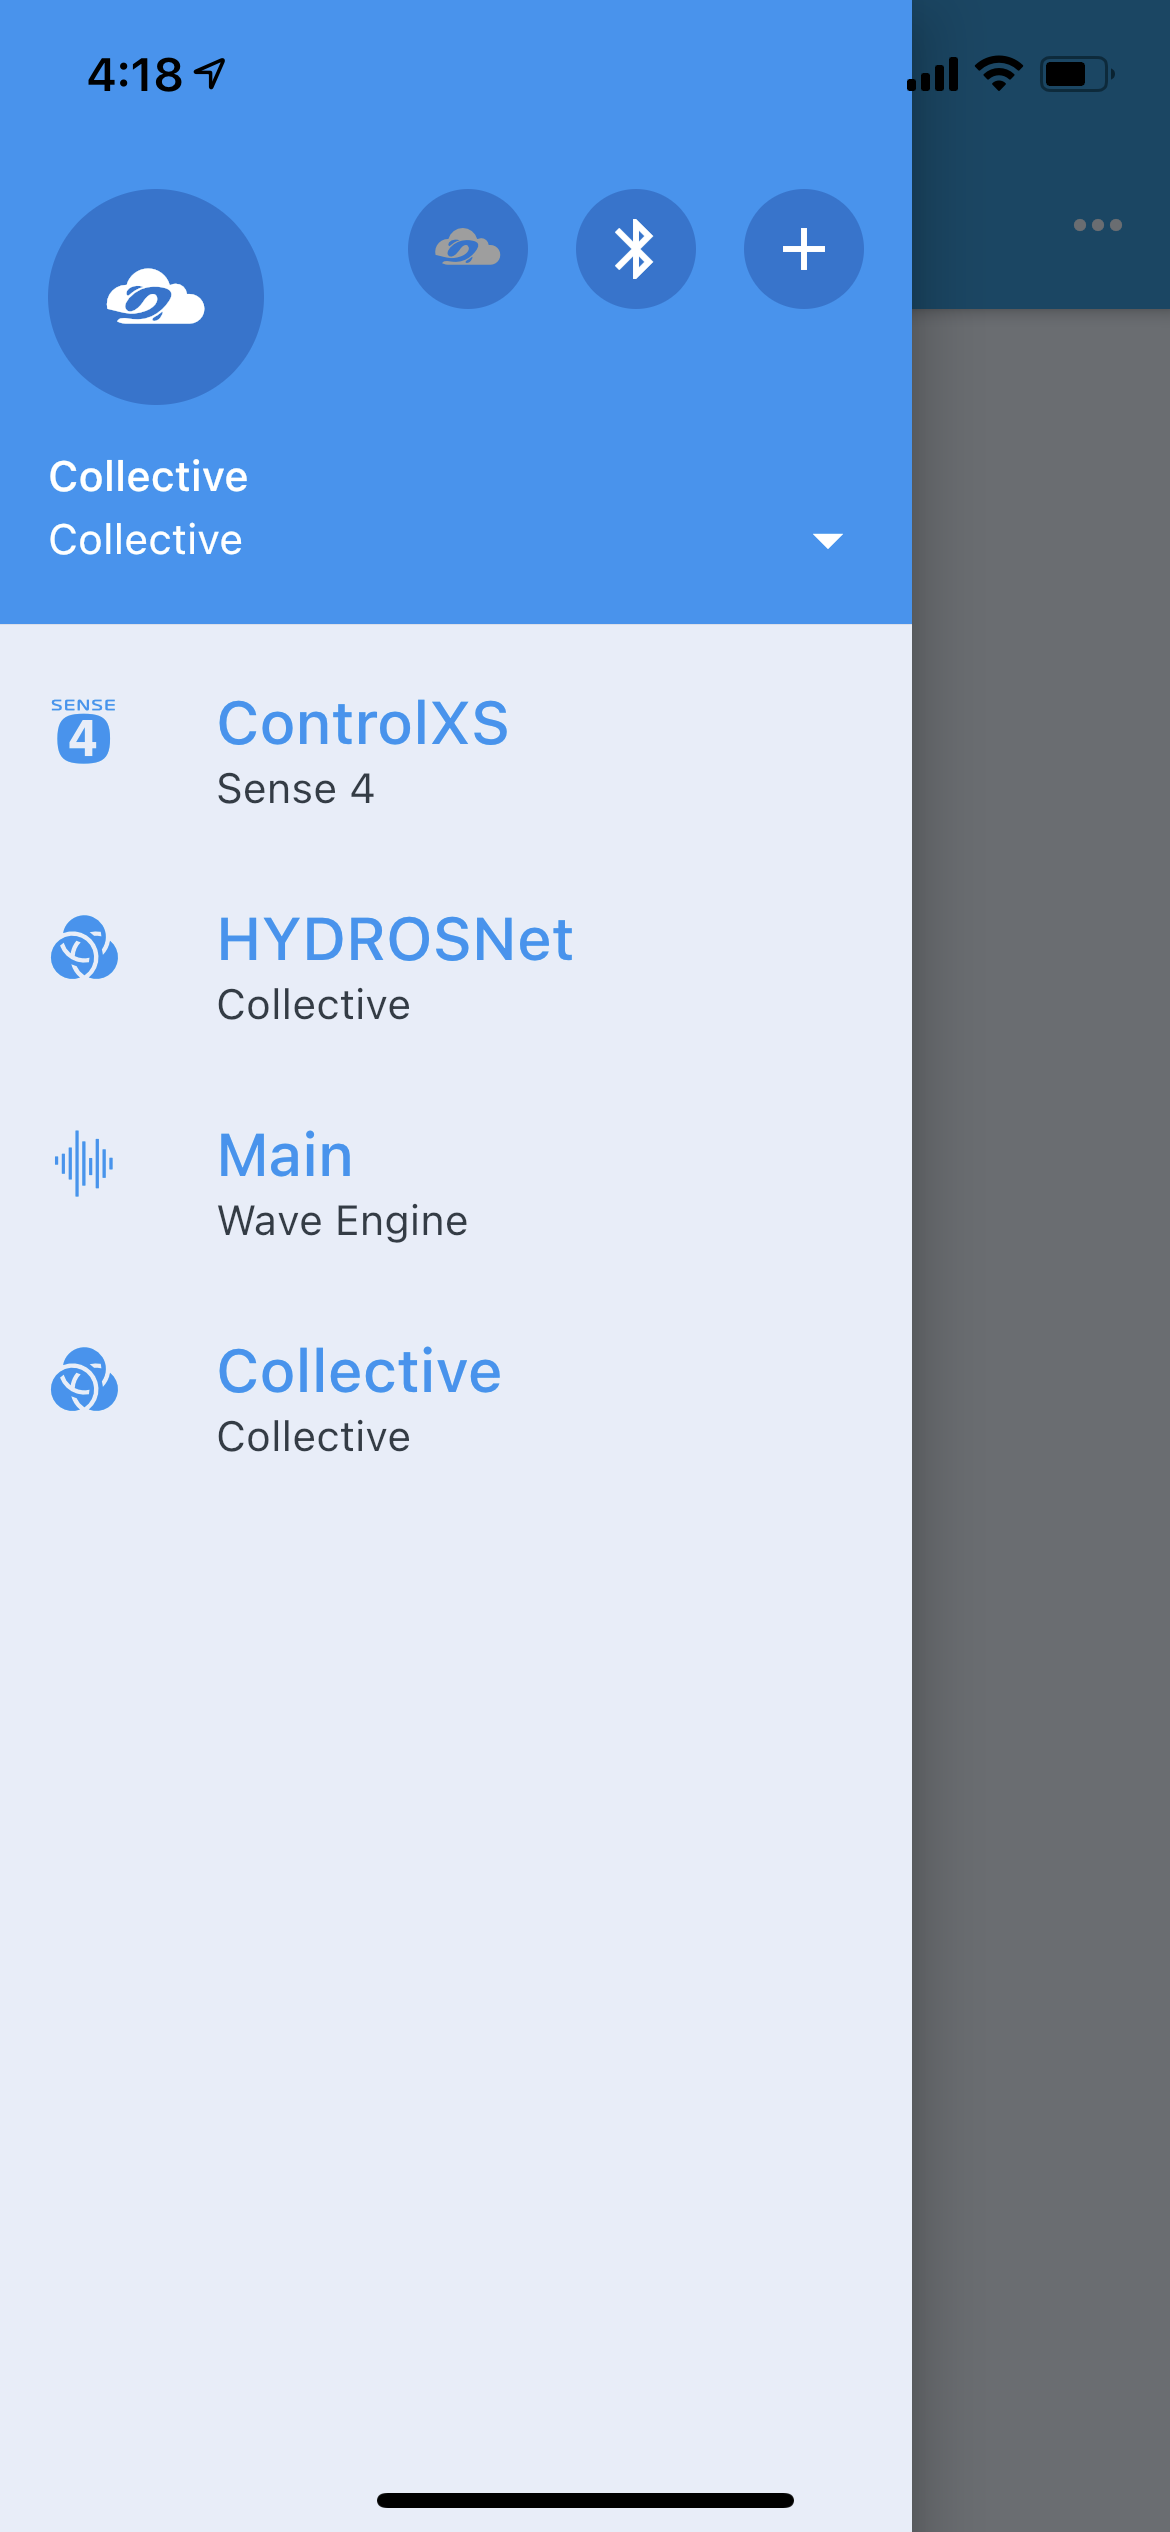
Tap on the upper-left-hand-corner hamburger menu and then select your new Collective.
In the details section, you should see the status and your first HYDROS device listed at the top of the STATUS screen.
Add subsequent devices to a Collective.
Here is what you’ll need to get started:
A HYDROS Collective with at least ONE device.
A NEW device is connected, registered to the cloud, AND running the latest firmware.
WARNING: The new device MUST be fully connected to the cloud and running the latest firmware. If not, it WILL break your Collective!
A full backup of your Collective. Please refer to our Backup and Restore page for instructions on backup your configuration.
Step 1: Physically connect your devices
Before adding a subsequent device(s) to your EXISTING Collective, you MUST connect the new HYDROS device to one of your HYDROS device(s) already in the Collective using Command Bus CablesTerminators.
Power down your Collective.
Add your new device by physically connecting it via the command bus port.
Power up the Collective, including the new device.
WARNING: Never ADD a device to live and powered Collective. If you disconnect a device to move to, be sure to power down your entire Collective, then connect the new device and power up the Collective. It will prevent any possible damage to the command bus ports by inserting a “hot” command bus cable.
Step 2: Connect to your Collective
WARNING: When adding a new device to an existing collective, it will be imported as blank. All new device data will be updated when added to an existing Collective.
Using the HYDROS app, connect to your Collective and go to the STATUS screen.
Step 3: Add the device
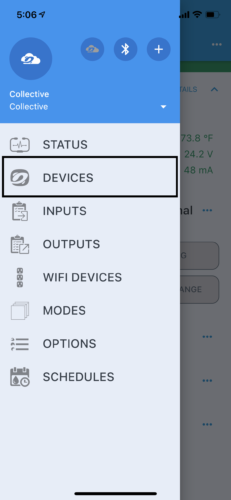
Tap on the upper left-hand corner of the STATUS screen and tap on “Devices.”
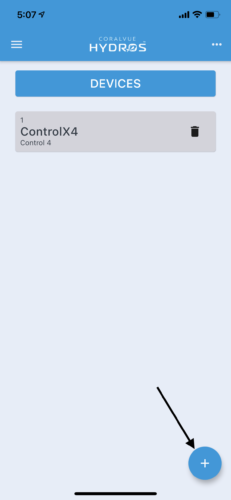
Tap on the “+” symbol at the bottom of the page.
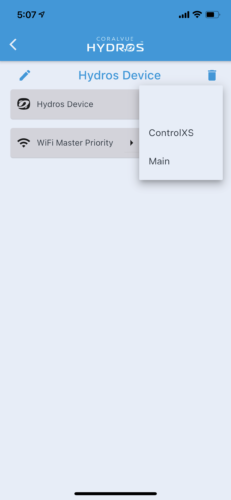
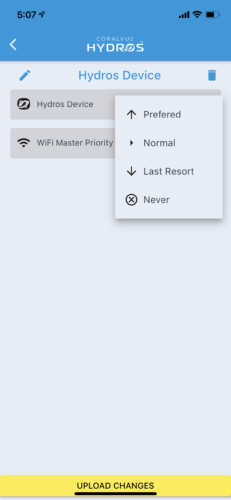
Under HYDROS Device, select the new device you add to the Collective.
Under WiFi Master Priority, select the priority for this new device.
Preferred: The device will try to become the master anytime a collective is restarted.
Normal: The device will try to become the master unless a device is set to “Preferred.”
Last Resort: The device will become the master ONLY if there are no Prefered or Normal priority devices
Never: The device will NEVER become a master
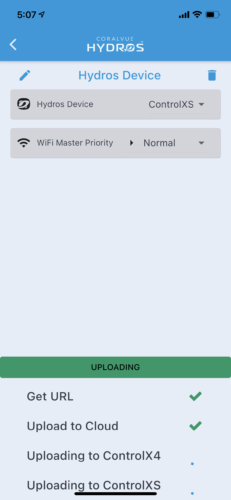
Tap on UPLOAD CHANGES to save.
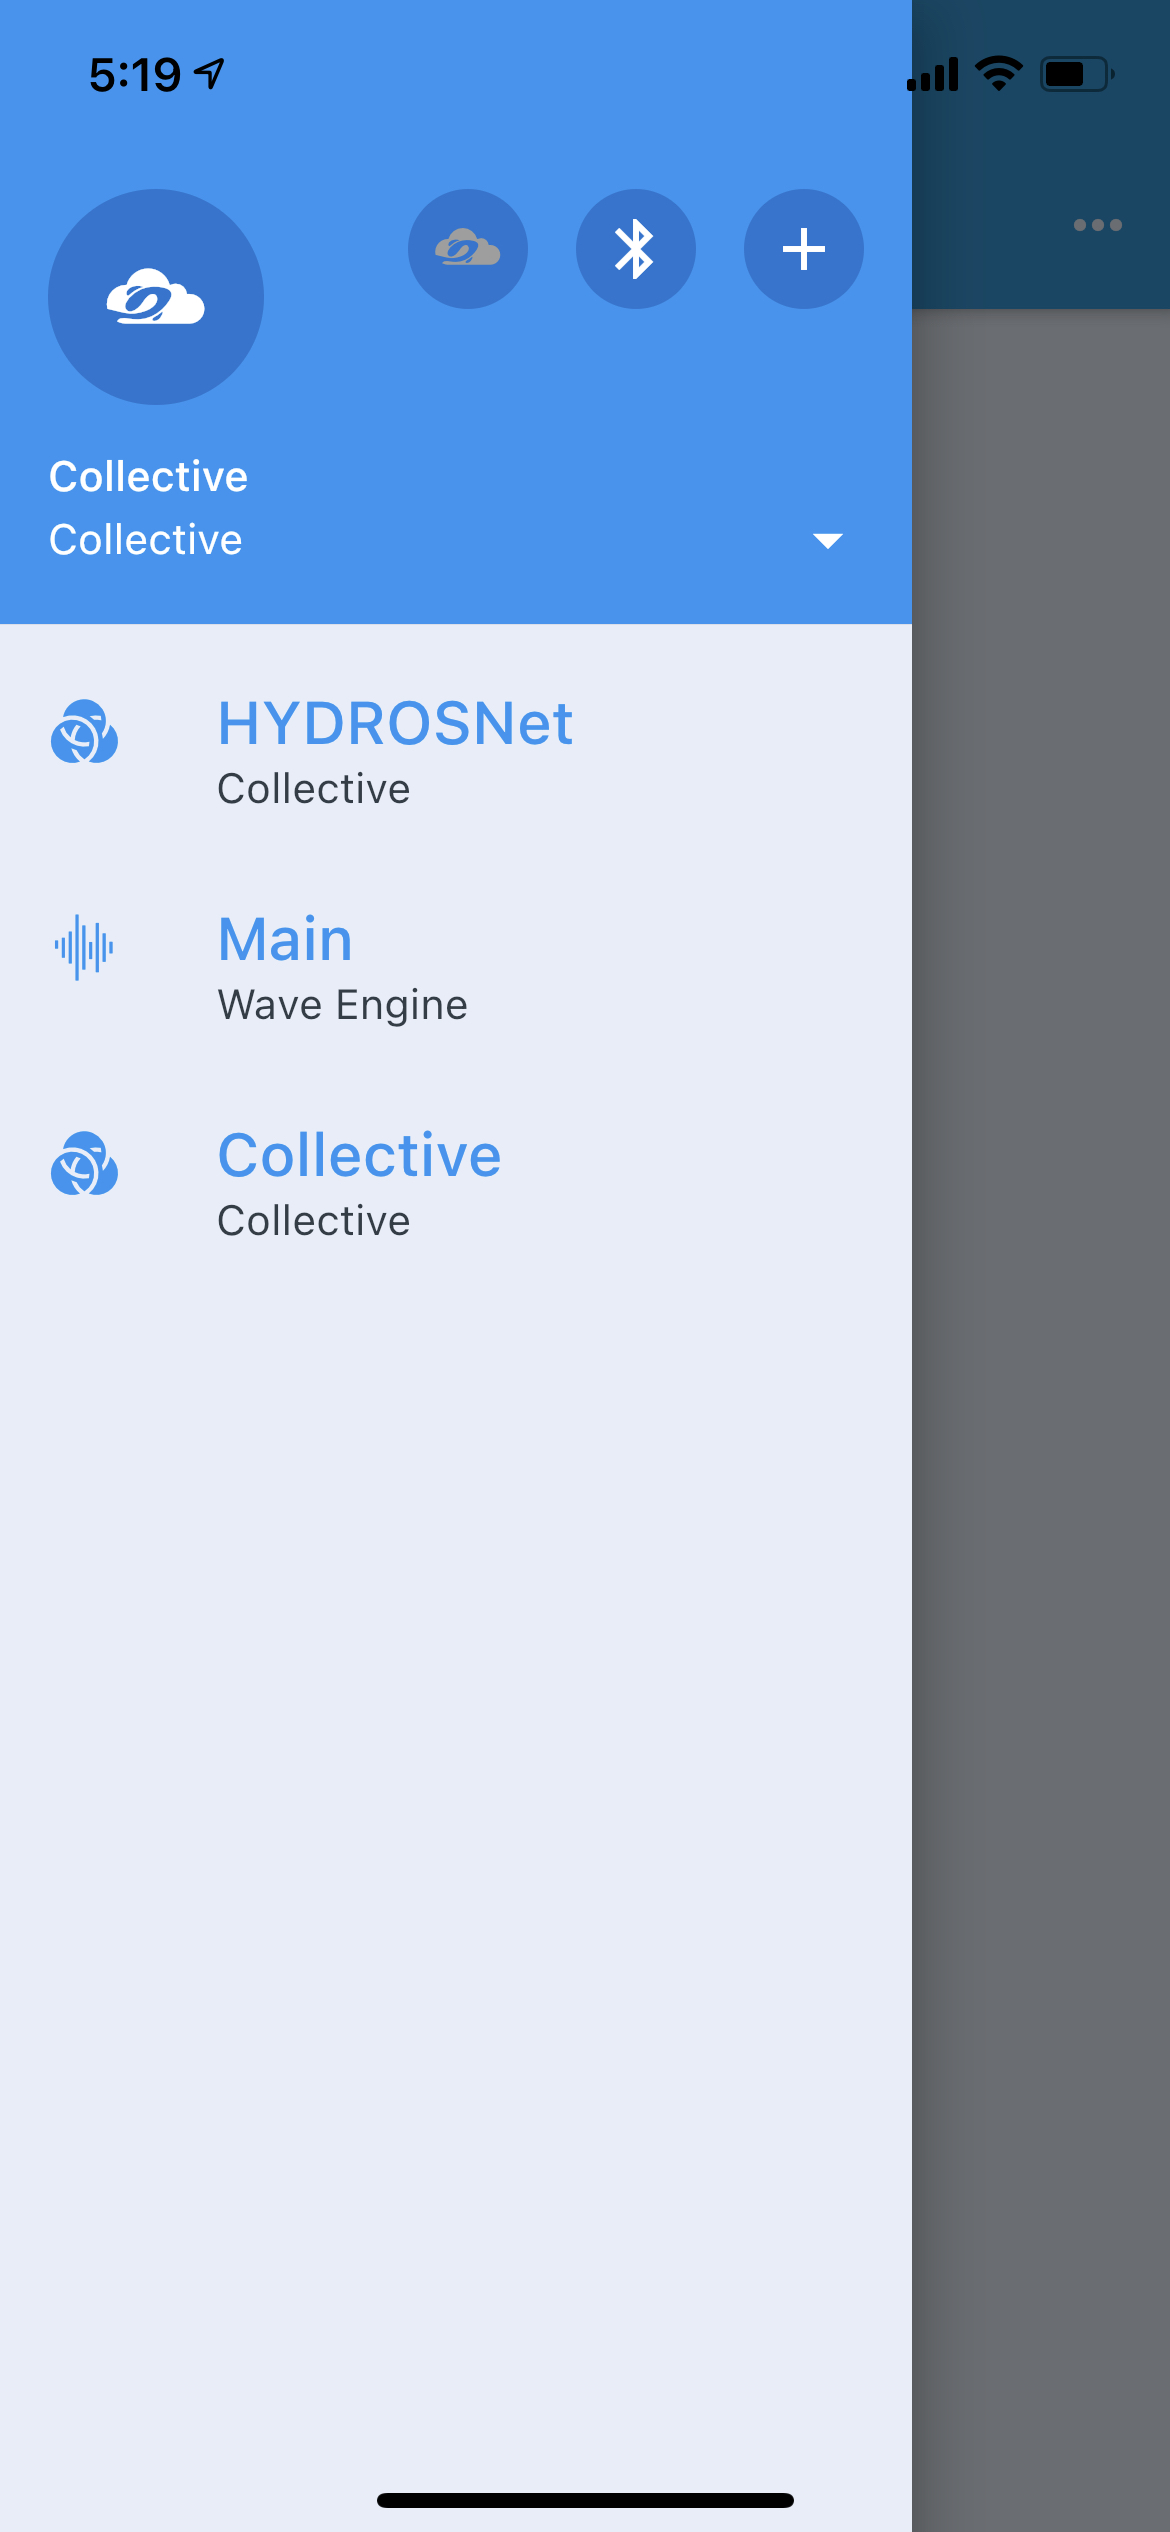
To confirm the device was added to the Collective, make sure the device is no longer listed on the left menu; the device will be listed in the details section of the STATUS screen.
Step 3: Configure your new Collective.
Your Collective is configured the same way you would configure an individual device.
Troubleshooting
Broken Collectives
A broken collective happens when multiple devices cannot communicate via the command bus port. Here are the possible causes for a b ken collective status:
Missing a Terminator: Every Collective requires a minimum of ONE (preferably TWO) Terminator physically connected to one or both ends of the collective chain.
To remove a device from a collective simply:
Tap on the upper-left-hand corner of the STATUS screen and select “Devices.”
Remove the device from the Collective until you have just ONE device.
Faulty Command Bus Cable: It allows each HYDROS device to communicate. If the cable is faulty, the devices will not communicate, resulting in a broken collective.
To fix the problem:
Reattach the command bus cable or completely replace it
Added a HYDROS Device that is Not Registered or Fully Connected to the Cloud: Before adding the device to the Collective, you must connect it to your home WiFi and register it to the cloud. You MUST access the device individually and successfully view the STATUS screen.