Testing the alkalinity in a reef tank is important as it plays a crucial role in maintaining the stability of pH levels. This is essential for the health and growth of coral and other reef inhabitants. By measuring alkalinity, valuable insights can be gained into the tank’s carbonate buffering capacity. This ensures that optimal conditions are maintained for a thriving reef ecosystem.
Here is what you’ll need to get started:
 [1]
[1]

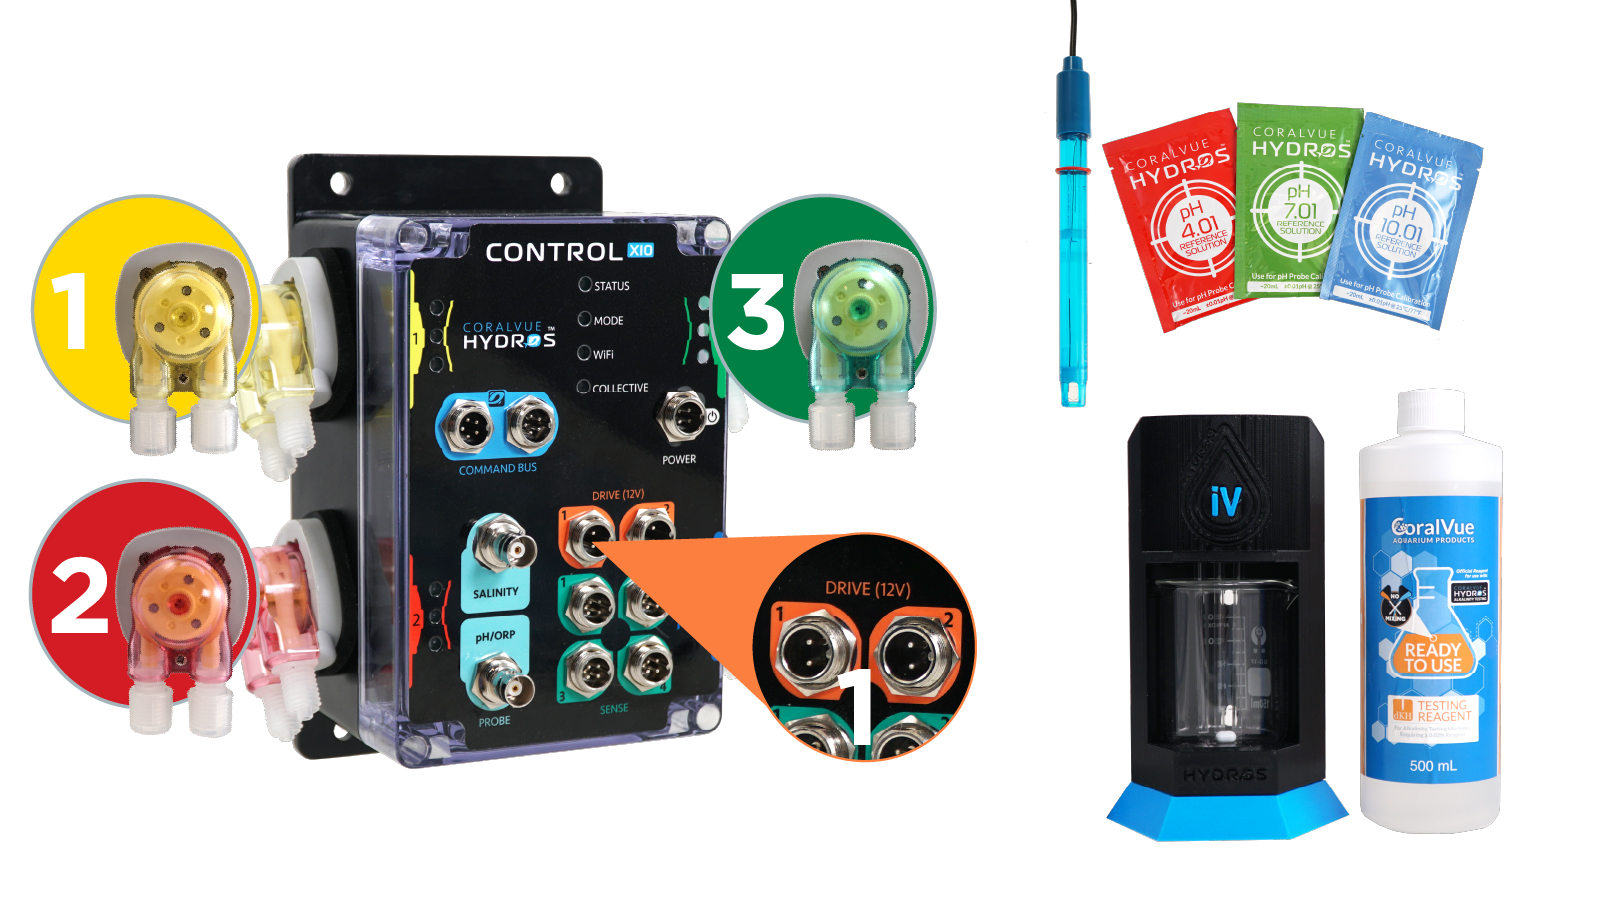
- A HYDROS collective with three available 12v Drive or 110v AC Simple Dosing Pumps, one Drive port, and one Probe port. Two Simple Dosing pumps (Fill and Drain) must be rated between 1 and 100 ml/min, and the third (Reagent) must be rated between 1 and 10 ml/min.
- A HYDROS iV Drive Port Accessory
- A pH probe with pH 4.01, pH 7.01, and pH 10.01 Calibration Fluids
- Concentrated Alkalinity Testing Reagent diluted at ONE part Alkalinity Reagent to FOUR parts RODI water.
TIP: For precise and uniform Alkalinity test outcomes, use an electronic scale to measure volumes during the reagent mixing.
Step 1: Physically install the iV
 [2]
[2]

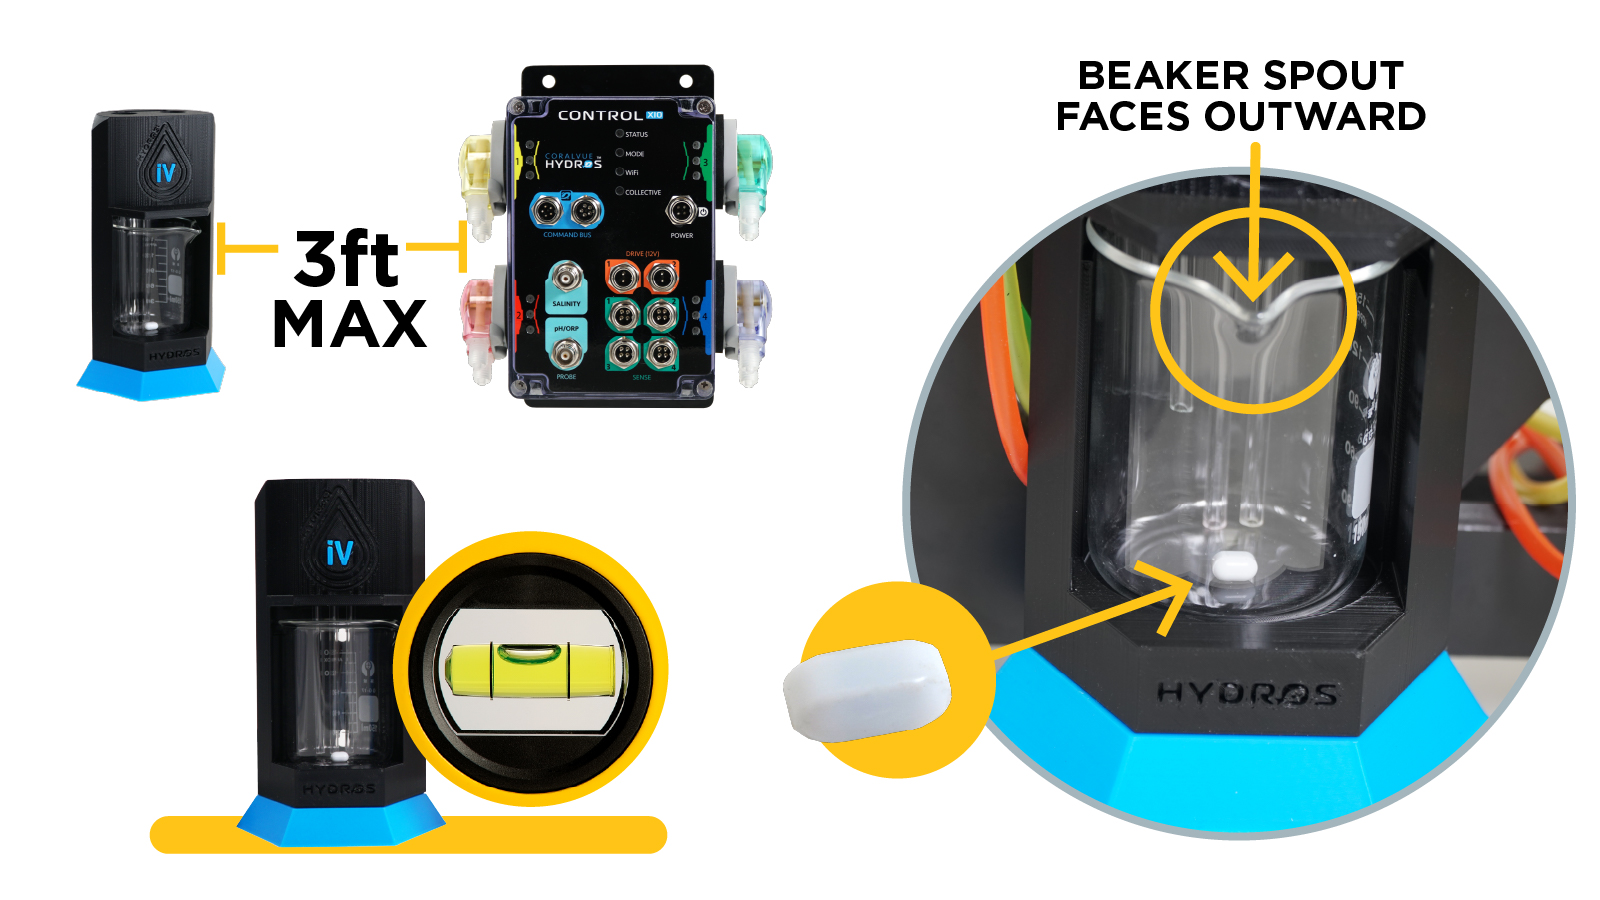
- To ensure proper installation, place the iV within a 3-foot radius of the X10 controller on a flat surface. Alternatively, you may attach the iV to a vertical surface using screws (which are not provided).
- Please make sure that the iV Testing vessel assembly is perfectly level.
- Please insert the magnetic mixing pill into the glass beaker.
- Place the glass beaker into the iV Testing Vessel assembly, ensuring the spout faces outward.
TIP: Remove and clean the beaker every 2-3 months with soap and water or if organic growth is noticed inside.
Step 2: Install Silicon Lines
-
Installing the Reagent Doser line:
 [3]
[3]
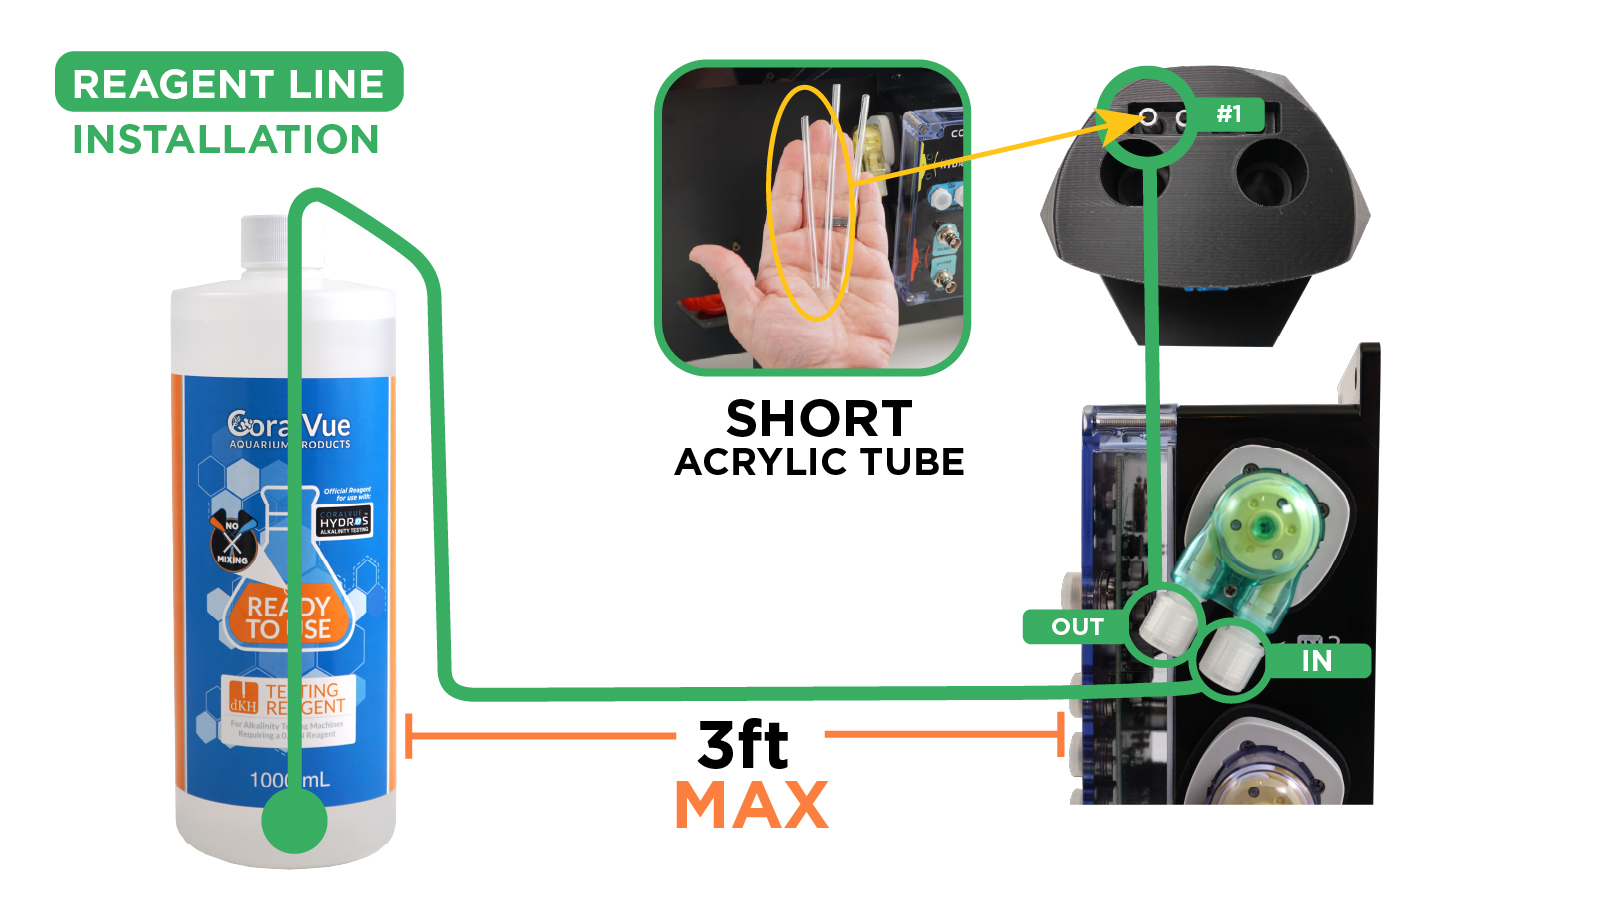
- Connect the X10’s Doser 3 (Green) using the included silicon line. Attach one end to the dosing pump’s input (back) and secure the other to the reagent container. Ensure the container is within 3 feet and trim the line accordingly.
- Connect another section of the same color line to the dosing pump output (front). Attach the other end to the short rigid acrylic tube (the shortest of the three included).
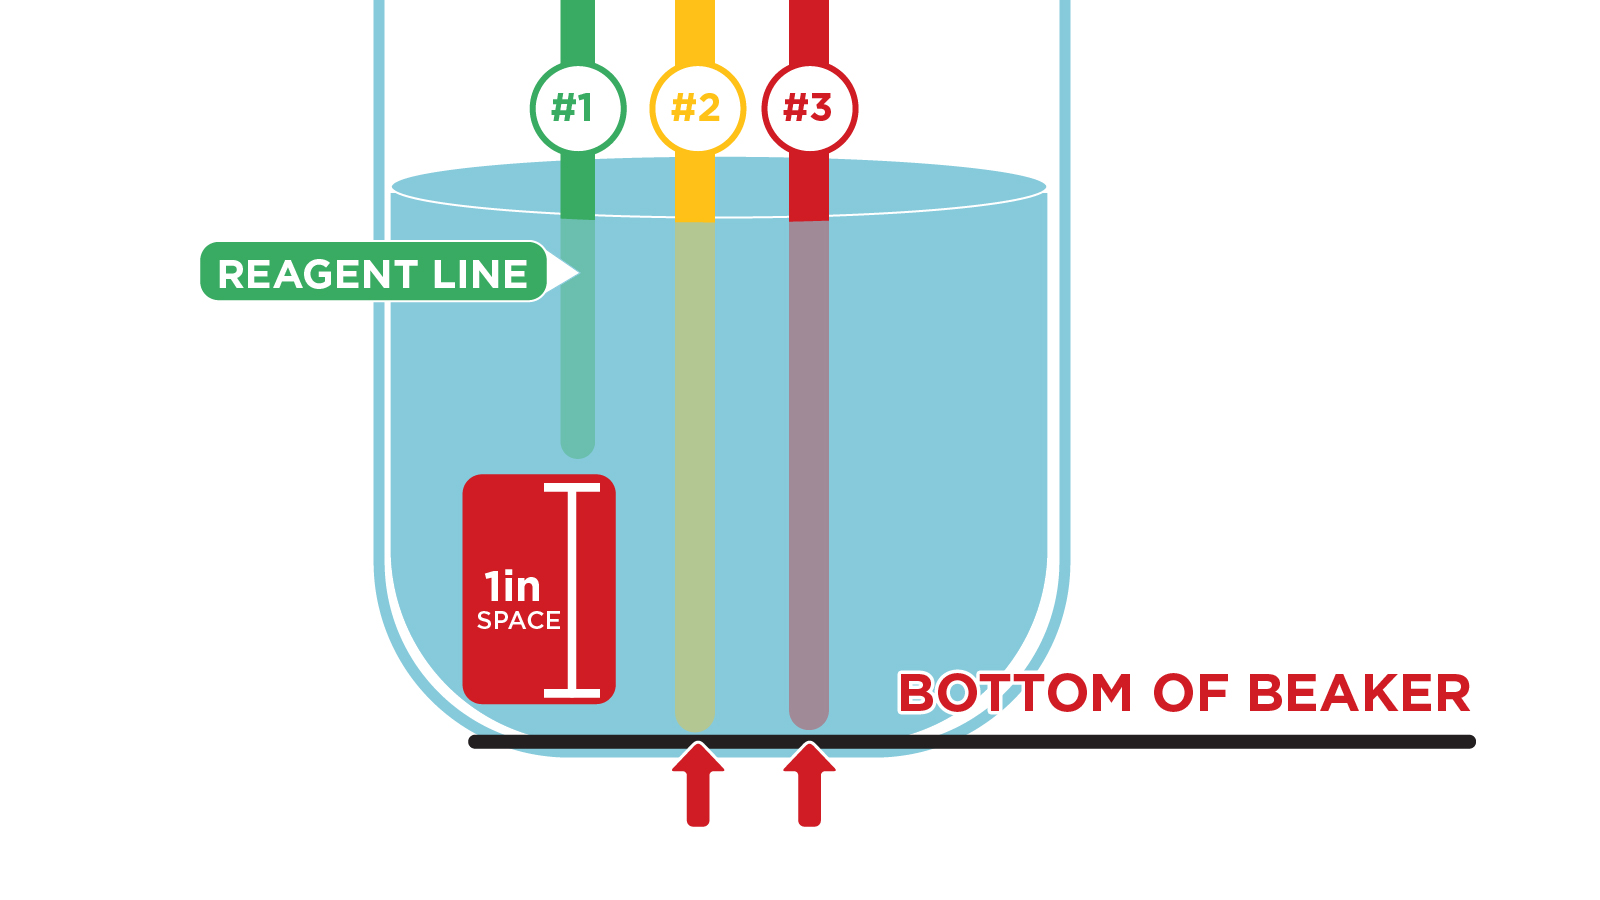
- Carefully insert the rigid acrylic tubing into tube holder one at the back top. Ensure the tube is firmly pushed down without touching the testing vessel’s bottom. The reagent line’s tip must be at least one inch away from the bottom and completely submerged during and after tests.
-
Installing the Drain Doser line:
 [4]
[4]
- Connect the X10’s Doser 2 (Red) using the included silicon line. Attach one end to the dosing pump’s back input (back) and secure the other to a nearby drain.
TIP: Returning the test water to your aquarium is completely safe as it does not contain any harmful elements that may negatively affect the organic life in the aquarium. However, this method in smaller systems containing less than 50 gallons of water is not recommended, as the dilution is significantly reduced. - To continue, connect another section of the line in the same color to the front of the dosing pump output. Then, attach one of the two rigid acrylic tubes that came with your iV.
- Please insert the rigid acrylic tube into tube holder number 3 at the top back of the iV. Ensure the hard tube is pushed down to the bottom of the testing vessel.
- Connect the X10’s Doser 2 (Red) using the included silicon line. Attach one end to the dosing pump’s back input (back) and secure the other to a nearby drain.
-
Installing the Fill Doser line:
 [5]
[5]
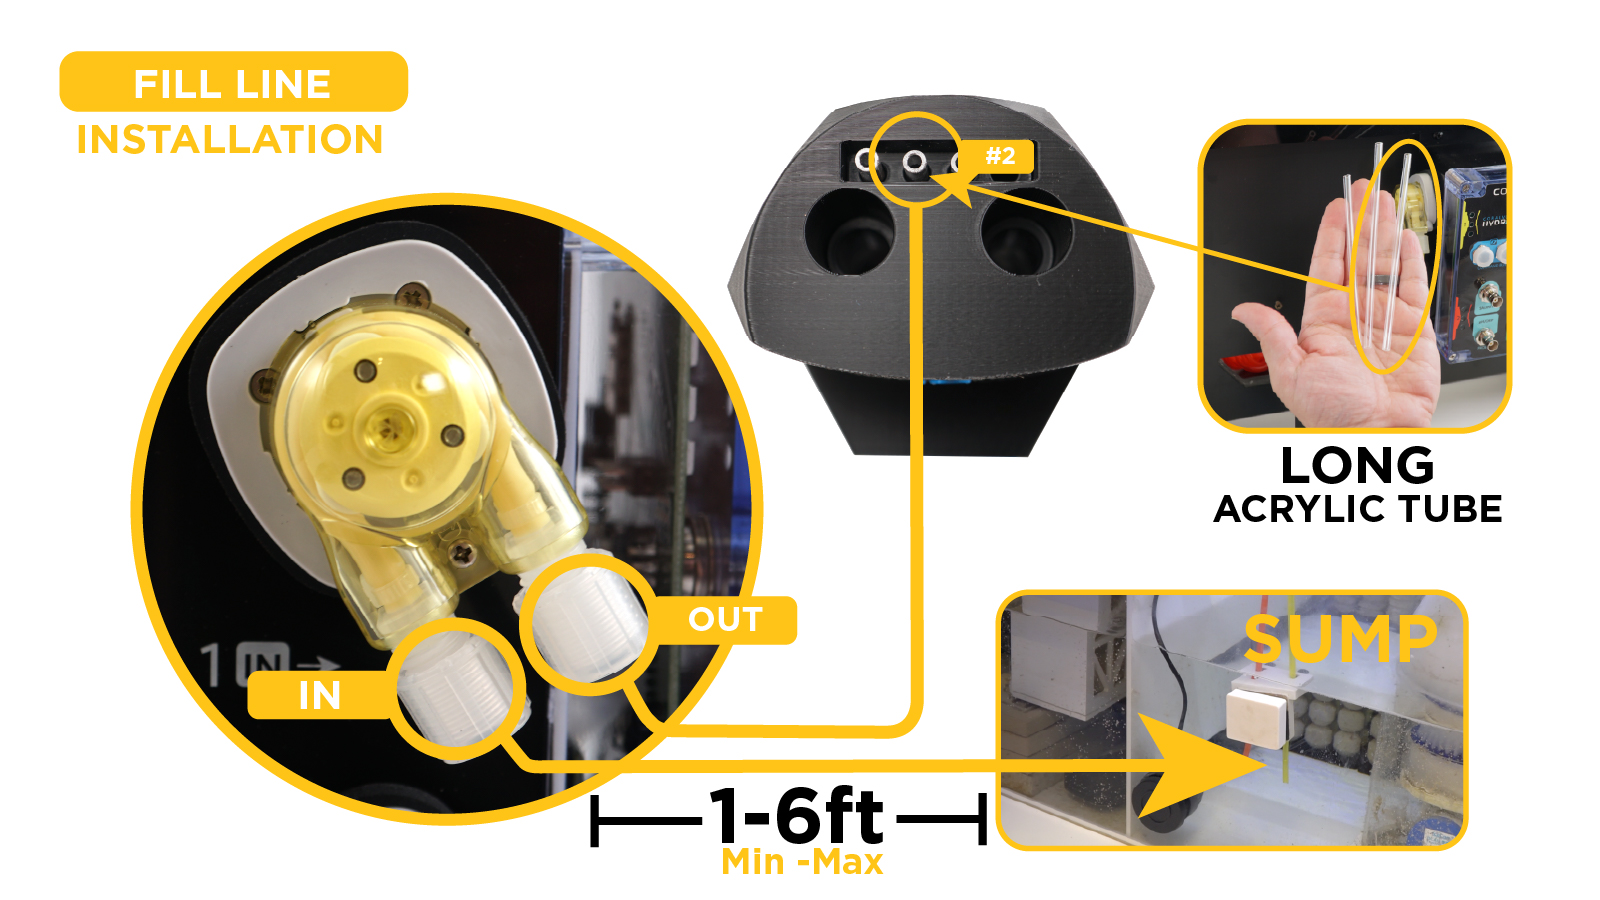
- Connect the X10’s Doser 1 (Yellow) using the included silicon line. Attach one end to the dosing pump input (back) and secure the other end to the side of your aquarium sump. It’s critical to ensure the line is always fully submerged in water.
WARNING: Ensure the line length from the aquarium sump to the doser head DOES NOT exceed six feet but is NOT LESS than one foot long. - To continue, connect another section of the line in the same color to the dosing pump output (front) and attach one of the rigid acrylic tubes that came with your iV.
- Please insert the rigid acrylic tube into tube holder number 2 at the top back of the iV. Ensure the rigid acrylic tube is pushed down to the bottom of the testing vessel.
- Connect the X10’s Doser 1 (Yellow) using the included silicon line. Attach one end to the dosing pump input (back) and secure the other end to the side of your aquarium sump. It’s critical to ensure the line is always fully submerged in water.


 [6]
[6]
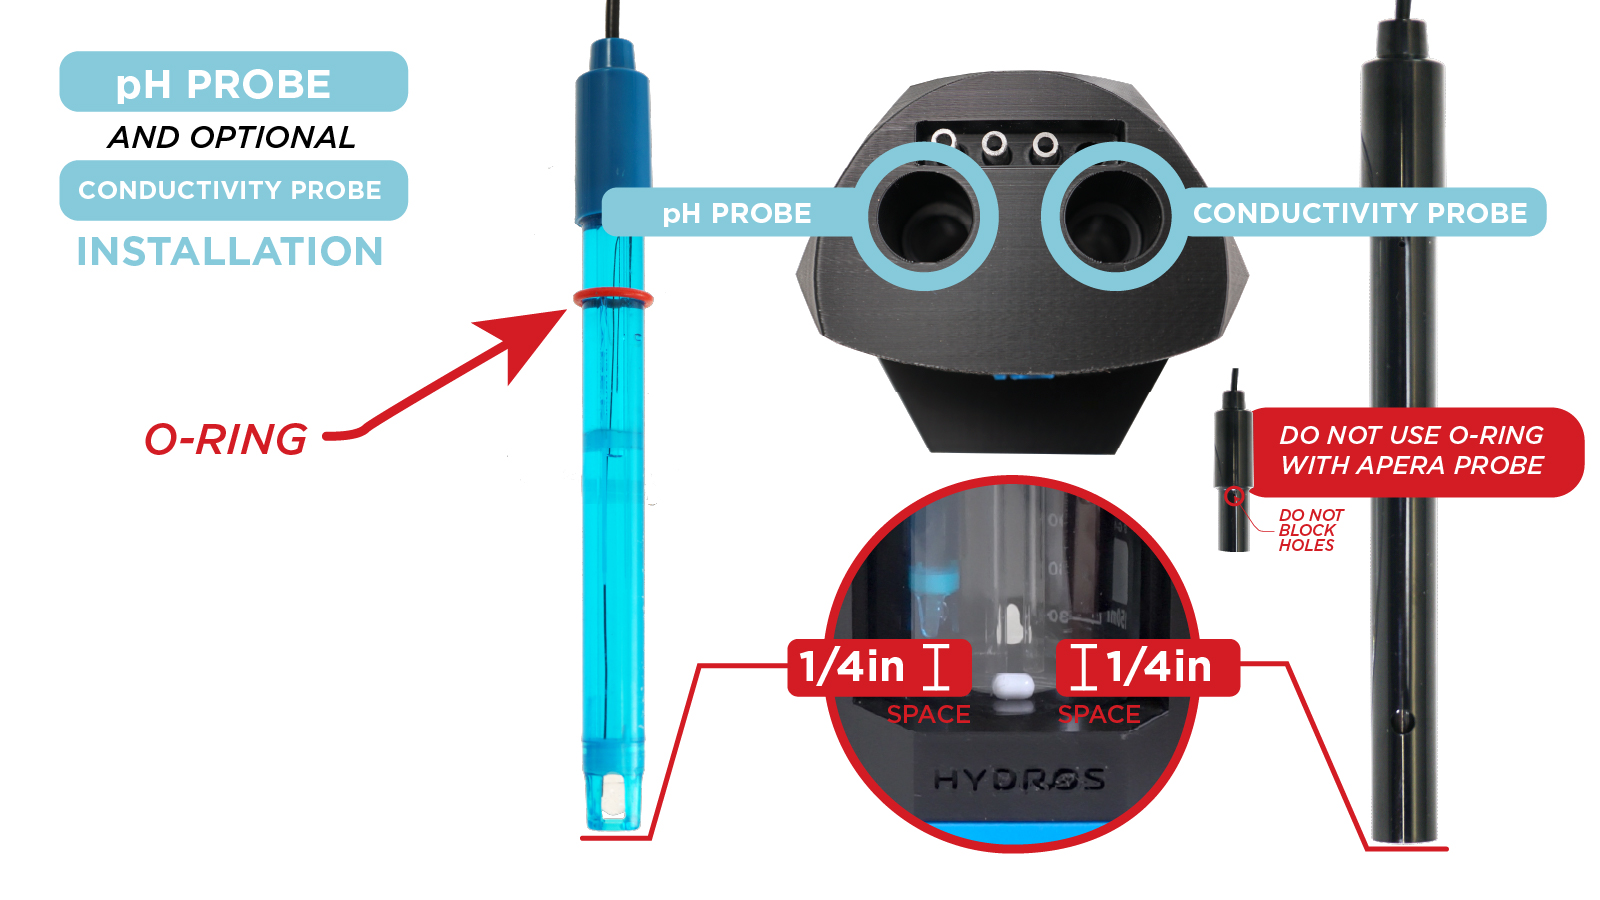
Step 3: Insert the pH and (optional) Conductivity Probe
 [7]
[7]

- Using the included probe o-ring, insert the pH probe into the iV probe holder 1. Ensure the probe tip is at least 0.25″ from the bottom of the testing vessel.
- OPTIONAL: Using the included probe o-ring, insert the Conductivity probe into the iV probe holder 2. Ensure the probe tip is at least 0.25 to 0.5 inches from the bottom of the testing vessel.
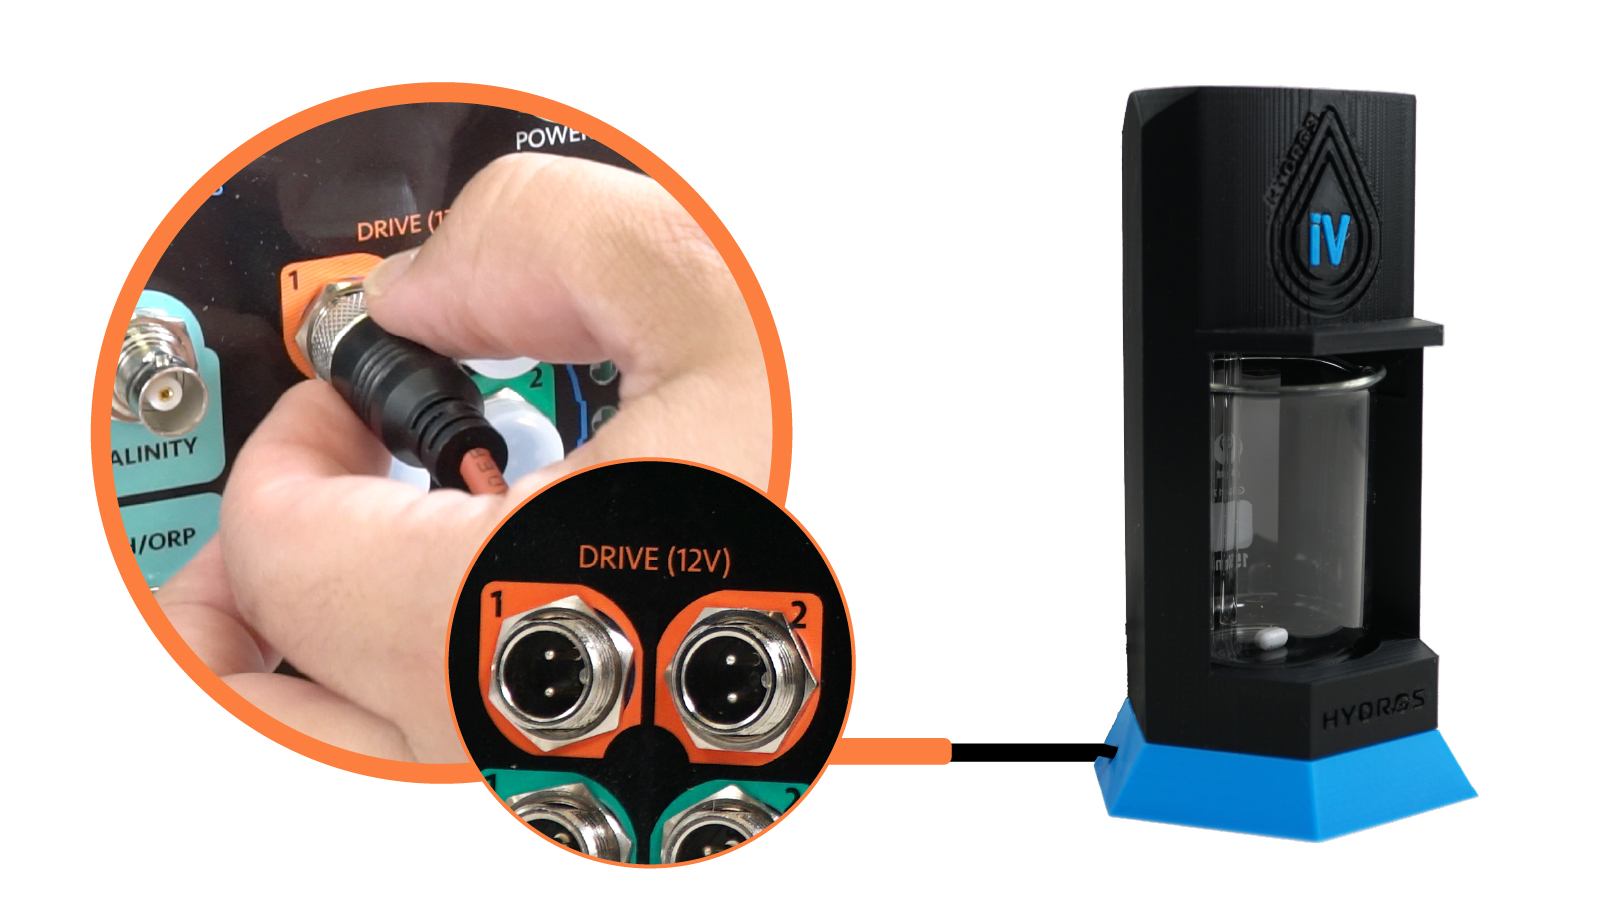
Step 4: Connect the iV motor to a drive port
 [8]
[8]

- Connect the iV motor to an available orange Drive port.
Step 5: Create the iV Output
- From the STATUS screen on your HYDROS app, tap on the three horizontal dots to the right of the OUTPUTS label and select “Add/Edit Output.”
- Tap on the + symbol at the bottom right of the page
- Type in the name of your new output and then tap “Create.”
Step 6: Configure the iV Output
- Recalibrate the Dosers every 4-6 weeks. This will ensure that the doser is functioning correctly and producing reliable results.
 [9]
[9] - Replace the tubing around the head rollers every six months to maintain dosing consistency and avoid leaks caused by worn-out lines.
- Over time, the rollers and gears in the head can deteriorate and decrease accuracy. Replace them annually to ensure optimal performance.
- Family: iV
- Reagent Doser: Select “Create New Doser”
- The suggested output name, “iV Reagent/Drain/Fill,” is already filled in. You can change it before tapping the “Create” button.
- Family: Doser
- Type: Smart Doser
- Output Device: Select the Control X10 – Doser #3 (Green)
- Default Flow Rate: 3 mL/min.
- Used In Schedule: This lists all external Dosing Schedules used by this dosing pump.
- Notify When Reservoir Level Below (0=Never): You can choose the desired volume level for HYDROS to alert you when the container falls below it.
- Notification Level (Reservoir Low): Choose the type of notification to receive when the reagent container falls below the minimum level.
- Calibrate Doser: Refer to “Calibrating the Smart Dosers [10]” on the page below for instructions.
- Drain Doser: Select “Create New Doser”
- The suggested output name, “iV Reagent/Drain/Fill,” is already filled in. You can change it before tapping the “Create” button.
- Family: Doser
- Type: Smart Doser
- Output Device: Select the Control X10 – Doser #2 (Red)
- Default Flow Rate: Negative (-) 100 mL/min.
TIP: To decrease the doser’s noise, reduce its speed. However, it’s important to note that this will result in longer testing times.- Used In Schedule: This lists all external Dosing Schedules used by this dosing pump.
- Notify When Reservoir Level Below (0=Never): Choose the desired volume level for HYDROS to alert you when the container exceeds it. If the line returns to the sump or a drain, leave it at “0.”
- Notification Level (Reservoir Low): If the “Notify When Reservoir Level Below” is greater than “0,” choose the type of notification to receive when the reagent container exceeds the maximum level.
- Calibrate Doser: Refer to “Calibrate the Smart Dosers [10]” on the page below for instructions.
- Fill Doser: Select “Create New Doser”
- The suggested output name, “iV Reagent/Drain/Fill,” is already filled in. You can change it before tapping the “Create” button.
- Family: Doser
- Type: Smart Doser
- Output Device: Select the Control X10 – Doser #1 (Yellow)
- Default Flow Rate: 100 mL/min.
TIP: To decrease the doser’s noise, reduce its speed. However, it’s important to note that this will result in longer testing times.- Used In Schedule: This lists all external Dosing Schedules used by this dosing pump.
- Notify When Reservoir Level Below (0=Never): Leave this set to “0.”
- Calibrate Doser: Refer to “Calibrate the Smart Dosers [10]” on the page below for instructions.
- Stirrer Output Device: You can specify the orange drive port where you connected the iV motor.
- Stirrer Power Safe Range: It allows you to specify a power use range considered “acceptable.” If power consumption is outside the range, a notification will trigger if selected.
TIP: The iV stirring motor uses around 2 watts of power. Set this range between 1 and 3 watts. - Stirrer Power Notification Level: Choose the notification level triggered when the power consumption falls outside the safe range for the stirrer power.
- Stirrer Power Safe Range: It allows you to specify a power use range considered “acceptable.” If power consumption is outside the range, a notification will trigger if selected.
- iV pH Input: Select “Create New pH Input.”
- The suggested output name, “iV pH Input,” has already been filled out. If you want to change it, you can do so before tapping the “Create” button.
- Type: Probe Port
- Probe Port: Select the probe (light blue) port to connect the pH probe physically.
TIP: We suggest using the X10 pH port to connect the iV pH probe instead of opting for other HYDROS devices like X4 or X3. - Probe Mode: pH
- Safe Range: A default of 3.5 to 13 is recommended, as pH measurements will routinely be in the 4.1s (depending upon the Alkalinity Test Method selected below) and mid-8s (depending upon the actual tank pH).
- Graph Limits: 4 to 13.
- Temperature Input: This allows you to select a temperature probe to help make the pH reading more accurate.
- Offset: Use this option to make minor corrections to the pH reading if it is “slightly” off after running a full pH calibration. The maximum offset allowed is -0.5 to 0.5. Please recalibrate or replace the probe if the discrepancy exceeds the offset range.
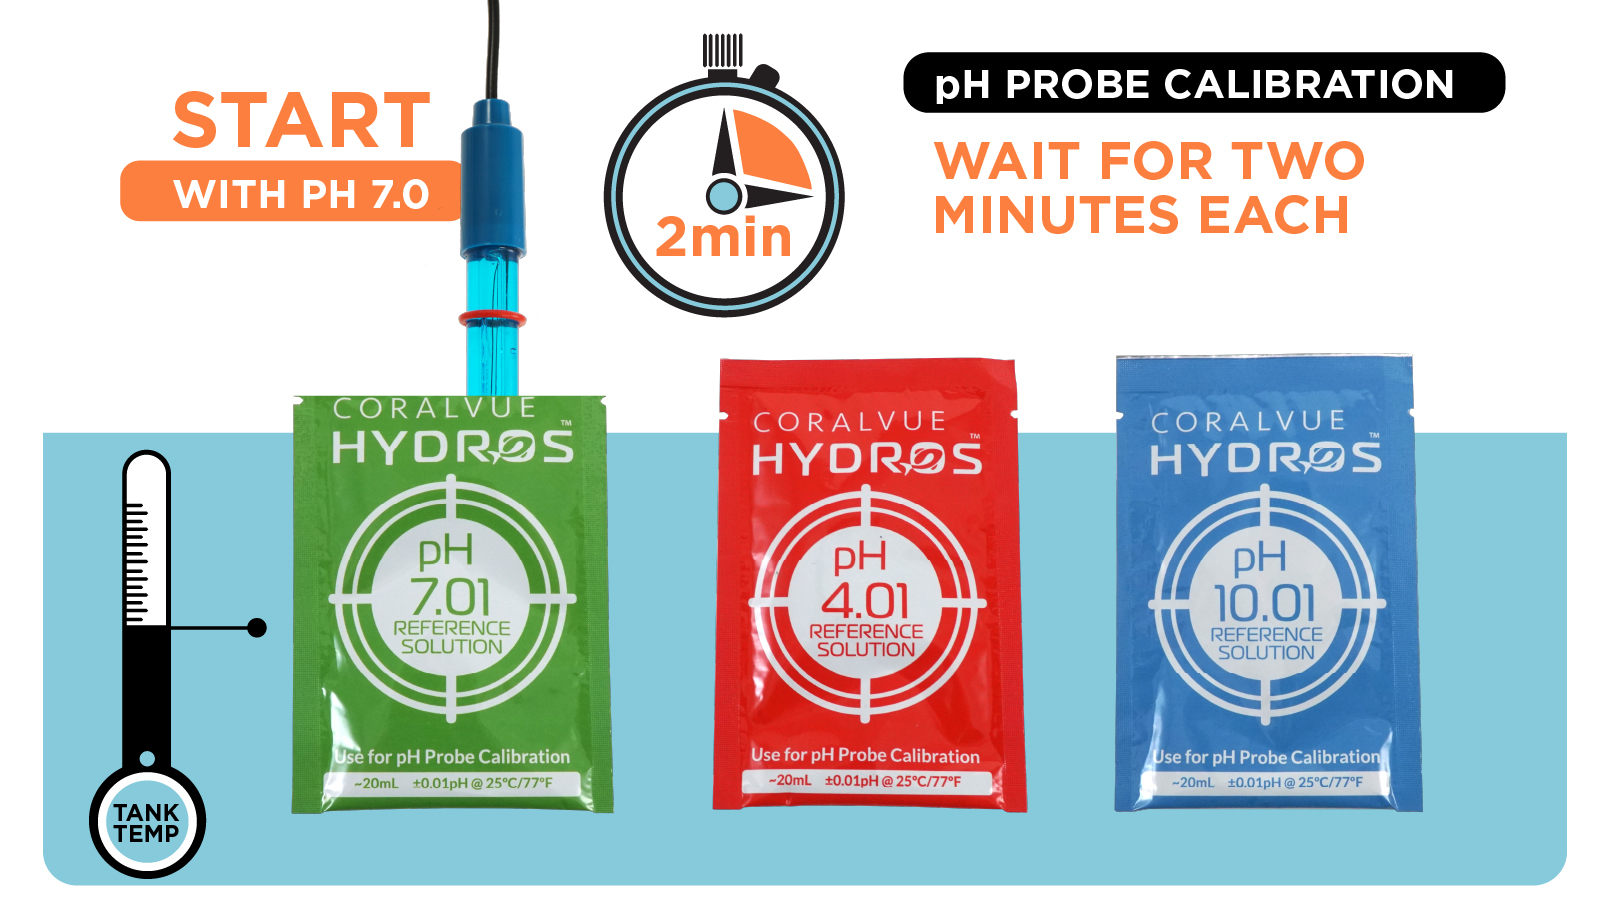
- Calibration: Always calibrate with solution 7.01 first.
 [11]
[11]
TIP: Recalibrate the pH probe every 4-6 weeks for accurate readings. This will ensure the probe is functioning properly and producing reliable results.- Step 1: Calibrate 7.01
- Remove the small storage container from the probe’s tip
- Rinse the probe in RODI water and then gently tap it dry with a paper towel.
- Place the probe into the 7.01 calibration solution and swirl it around to ensure no air bubbles are trapped inside the probe’s tip.
- Tap the “Recalibrate” button on the app and WAIT for 2 MINUTES!
- After the 2 minutes have passed and the value has stabilized, press “Accept.”
- Step 2: Calibrate 4.01
- Repeat the same process as 7.001, but use the 4.01 calibration fluid.
- Step 3: Calibrate 10.01
- Repeat the same process as 7.01, but use the 10.01 calibration fluid.
- Step 1: Calibrate 7.01
- Notification Level: This option lets you specify the notification level you want to receive. You will receive notifications when:
-
- pH is below the Safe Range Low.
- pH is above the Safe Rage High.
- The control has lost connection to the sensor.
-
- Is Invisible: If you choose to hide the input from the status screen, it will only become visible on pages that have “Show Invisible” selected.
- Do not upload any changes; instead, tap the arrow in the upper left-hand corner to return to the iV setup page.
- Alkalinity Repeat Test Threshold: If there is a significant discrepancy between the current test result and the previous one, HYDROS can initiate a new test to confirm the accuracy of the results. You can choose the degree of difference that triggers an automatic verification test. If a verification test is necessary, HYDROS will disregard the initial test results.
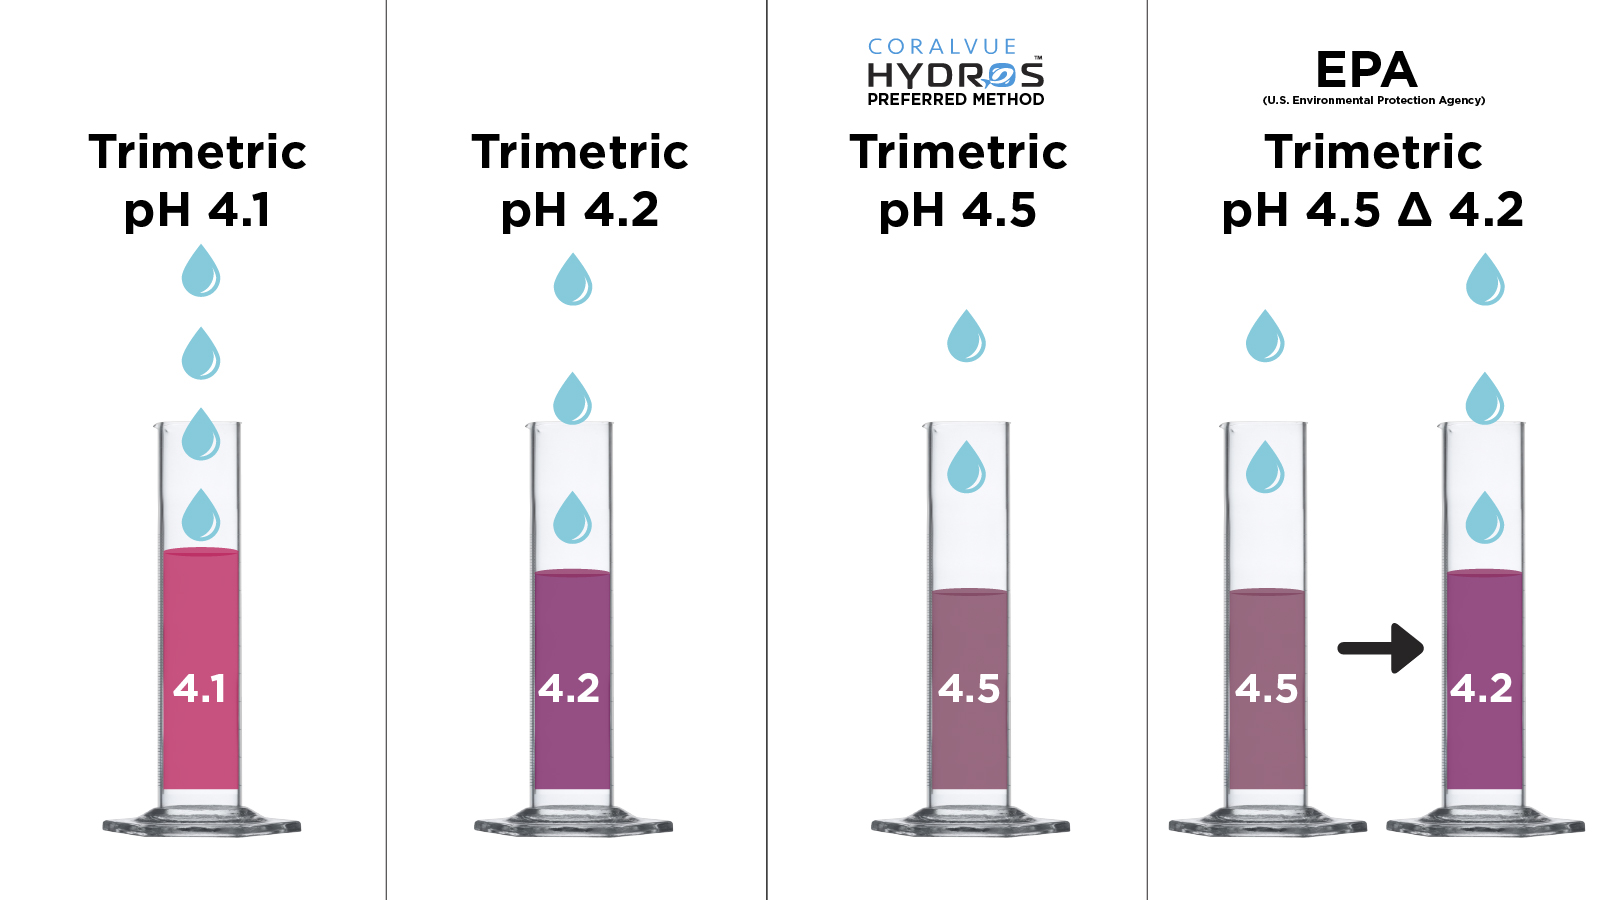
- Alkalinity Test Method: Select the Alkalinity Titration Method’s endpoint you prefer:
- Trimetric pH 4.1: Alkalinity is computed by the volume of acid required for the testing solution to reach a pH of 4.1.
- Trimetric pH 4.2: Alkalinity is computed by the volume of acid required for the testing solution to reach a pH of 4.2.
- NEMI (Trimetric pH 4.5): Alkalinity is computed by the volume of acid required for the testing solution to reach a pH of 4.5.
- EPA (Trimetric pH 4.5 Δ 4.2): Alkalinity is computed by the volume of acid required for the testing solution to reach a pH of 4.5 and then subtracting the volume needed for the solution to go from a pH of 4.5 to 4.2. This method of choice by the EPA (U.S. Environmental Protection Agency) was developed by the Acid Rain Monitoring Project of the University of Massachusetts Water Resources Research Center. It also renders the lowest Alkalinity results.
 [12]TIP: Q: How is alkalinity calculated?
A: Alkalinity in saltwater is measured through titration, a chemical analysis method. A sample of saltwater is treated with an acidic solution of known concentration, and the amount of acid required to neutralize the alkaline substances in the water is determined. This is typically done by monitoring a pH indicator’s color change as the pH decreases during titration. Alkalinity is then calculated based on the volume of acid used and the known concentration. This measurement provides insight into the water’s capacity to resist changes in pH, which is crucial for understanding its buffering capacity and potential impact on marine ecosystems.Q: Why does HYDROS offer me multiple methods? This is the only product on the market that offers this option.
A: Although titration is widely used for measuring alkalinity, there is no standardized pH endpoint. Certain companies prefer to calculate when the pH level reaches 4.5, while others wait until it reaches 4.2. Consequently, different pH endpoints can yield various alkalinity results from the same water sample. At HYDROS, we believe in allowing consumers to choose the test they feel is most precise.Q: Which method should I select?
A: At CoralVue and HYDROS, the Trimetric pH 4.5 method is preferred for measuring alkalinity. However, it’s important to remember that alkalinity is not solely about the numerical value but the long-term stability. Avoid switching between testing methods frequently to achieve a specific number. Regardless of the chosen method, it’s crucial to maintain stability over an extended period. Ultimately, stability over time is more significant than achieving a precise individual number.
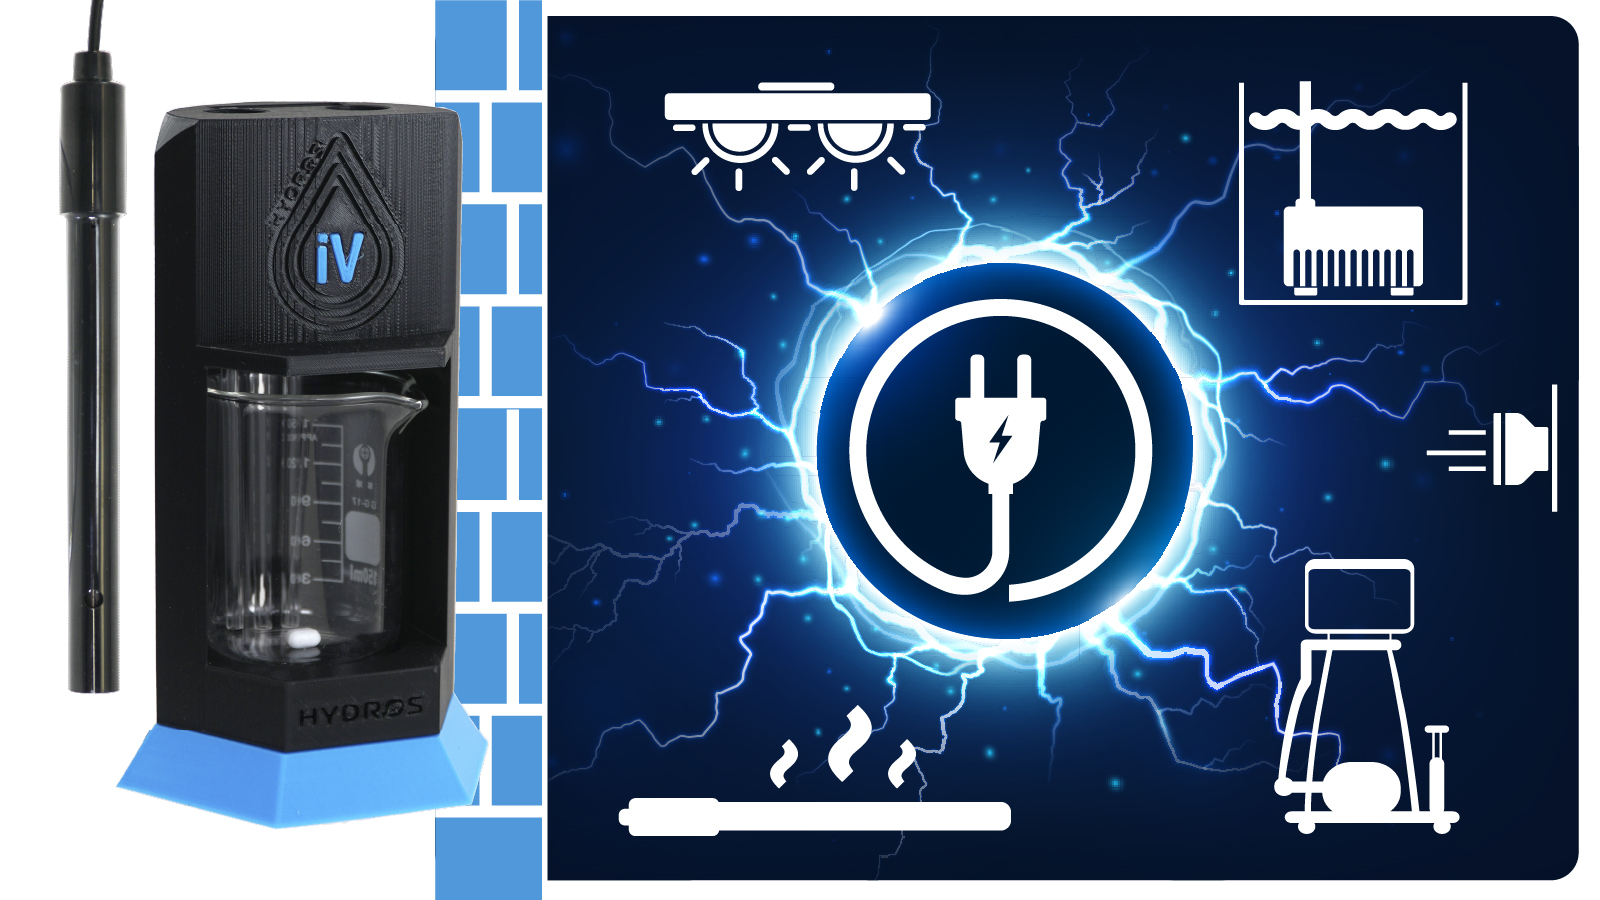
- Salinity Input (optional): Choose the input for the Conductivity probe to be inserted into the iV vessel. It is crucial to install the probe in the iV vessel rather than the aquarium to ensure isolation and prevent voltage interference from other equipment in the aquarium.
 [13]TIP: If you select or create a salinity input, HYDROS automatically generates and adds an “iV Tester Salinity” input to your status screen.
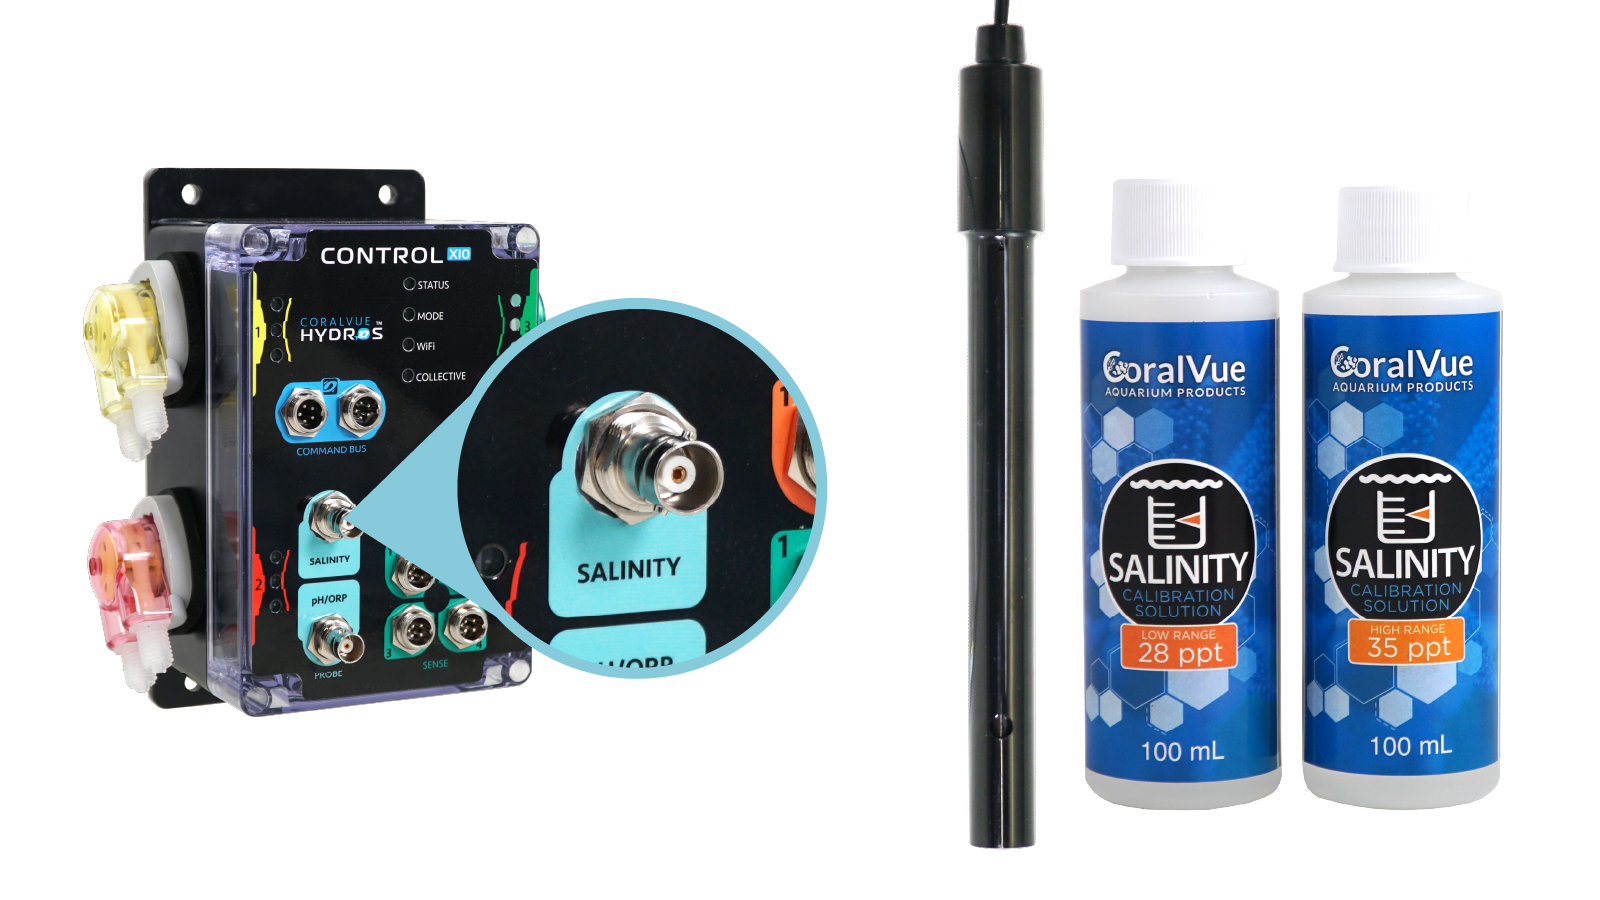 [14]
[14] - KH Schedule: You can create a simple or complex schedule to run the output.
TIP: The KH schedule will also automatically test pH and Salinity when testing Alkalinity.- Use External Schedules (advanced): To create a more complex testing schedule, you must enable this feature and create a “Testing Regimen Schedule [15].”
- Start Time: This is when the first test will become active.
- End Time: This is the time when the testing ends.
- Run Count (0 = no limit): The number of times the test will repeat within the Start/End times.
- Run Interval (How often): The time difference (how long) between each test starts within the Start/End times range.
- pH/Salinity Schedule: You can create a simple schedule to run the output.
TIP: This schedule is if you only want to test pH/Salinity without testing Alkalinity- Start Time: This is when the first test will become active.
- End Time: This is the time when the testing ends.
- Run Count (0 = no limit): The number of times the test will repeat within the Start/End times.
- Run Interval (How often): The time difference (how long) between each test starts within the Start/End times range.

Step 7: Upload the Changes
- After configuring the output, tap the yellow bar at the bottom to upload your changes to the cloud and each HYDROS device.
- iV Tester (output)
- A Drain Doser (output)
- A Fill Doser (output)
- A Reagent Doser (output)
- An Alkalinity (input)
- A Sampled Salinity (input)
- A Sampled pH (input)
- A pH probe (invisible input)
- A Salinity probe (invisible input)
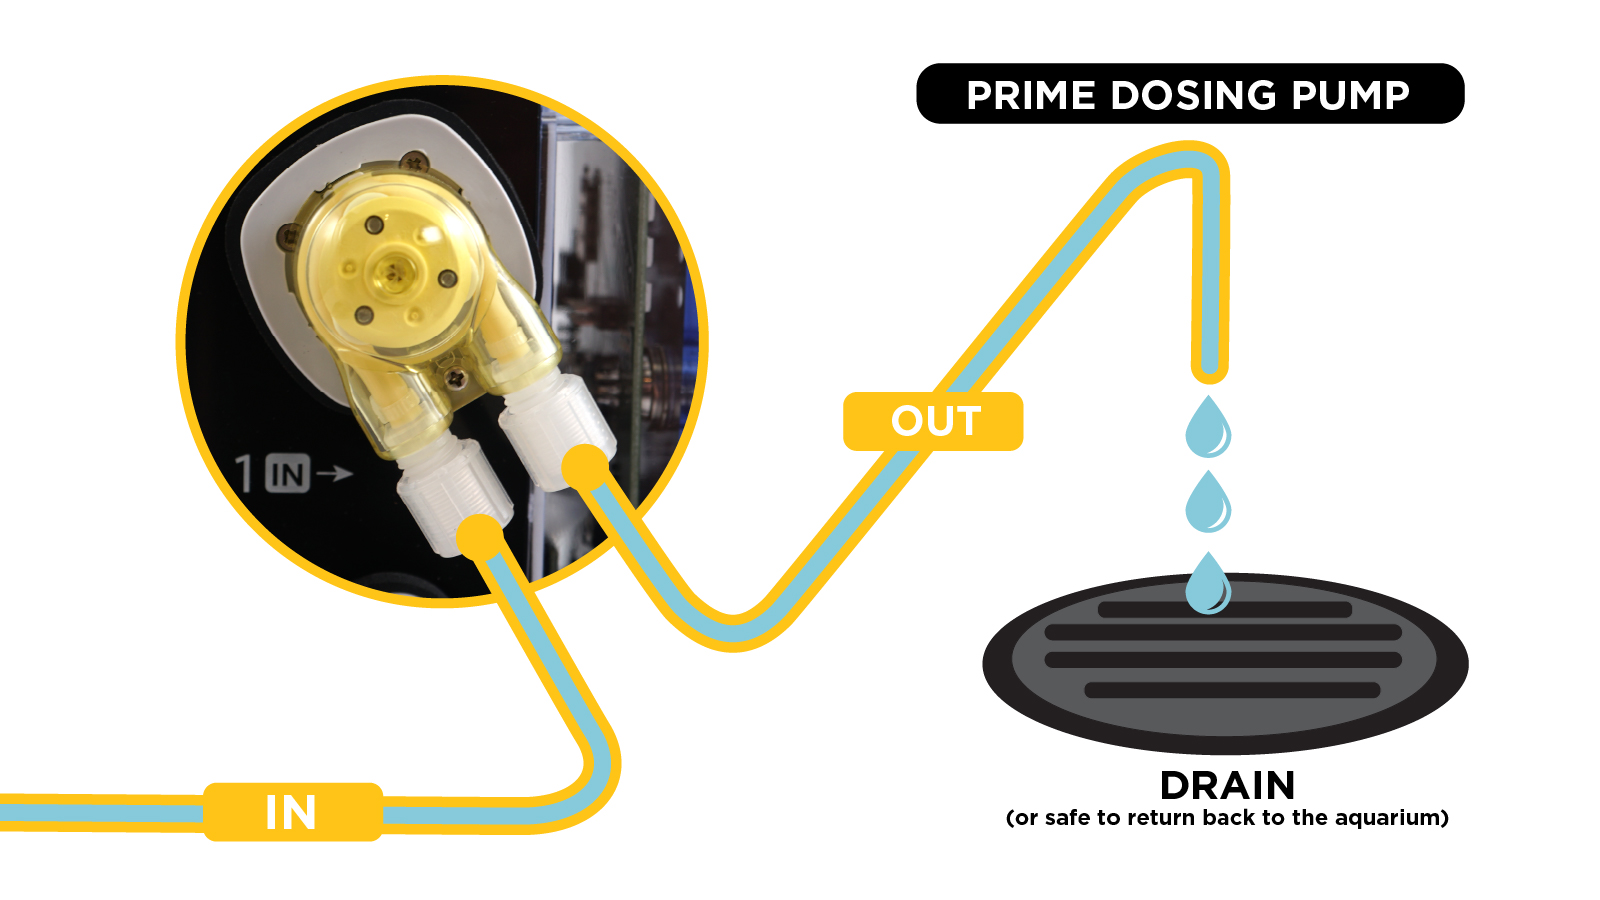
Step 8: Prime the Dosing Pumps
 [16]
[16]
If you already calibrated the dosers, you can skip this step. If you need to prime the lines, follow these steps:
- Place the output line of your dose in a container or drain.
- Perform a “One-Time Manual Dose [17]” until all air is purged from the line. Depending on the length of your line and the dozer’s speed, you might have to do multiple manual dosings.
- Once you see liquid exiting the output, the line is primed.
Optional: Define the Testing Regimen Schedule
After configuring your iV Testing Output, it is essential to tell the HYDROS control “when” to conduct a test. Please take a look at the instructions here [18] to learn how to create a Testing Regimen Schedule.
Calibrating the Dosers
You might calibrate the unit depending on the wear and tear and how much you use the smart doser. We recommend calibrating the dosing machines every 4 to 6 weeks.
 [9]
[9]
Here is what you will need:
- Smart Doser Pump (primed)
- You will need a calibrated measuring beaker to handle the “Default Flow Rate” of the doser specified in Step 6.
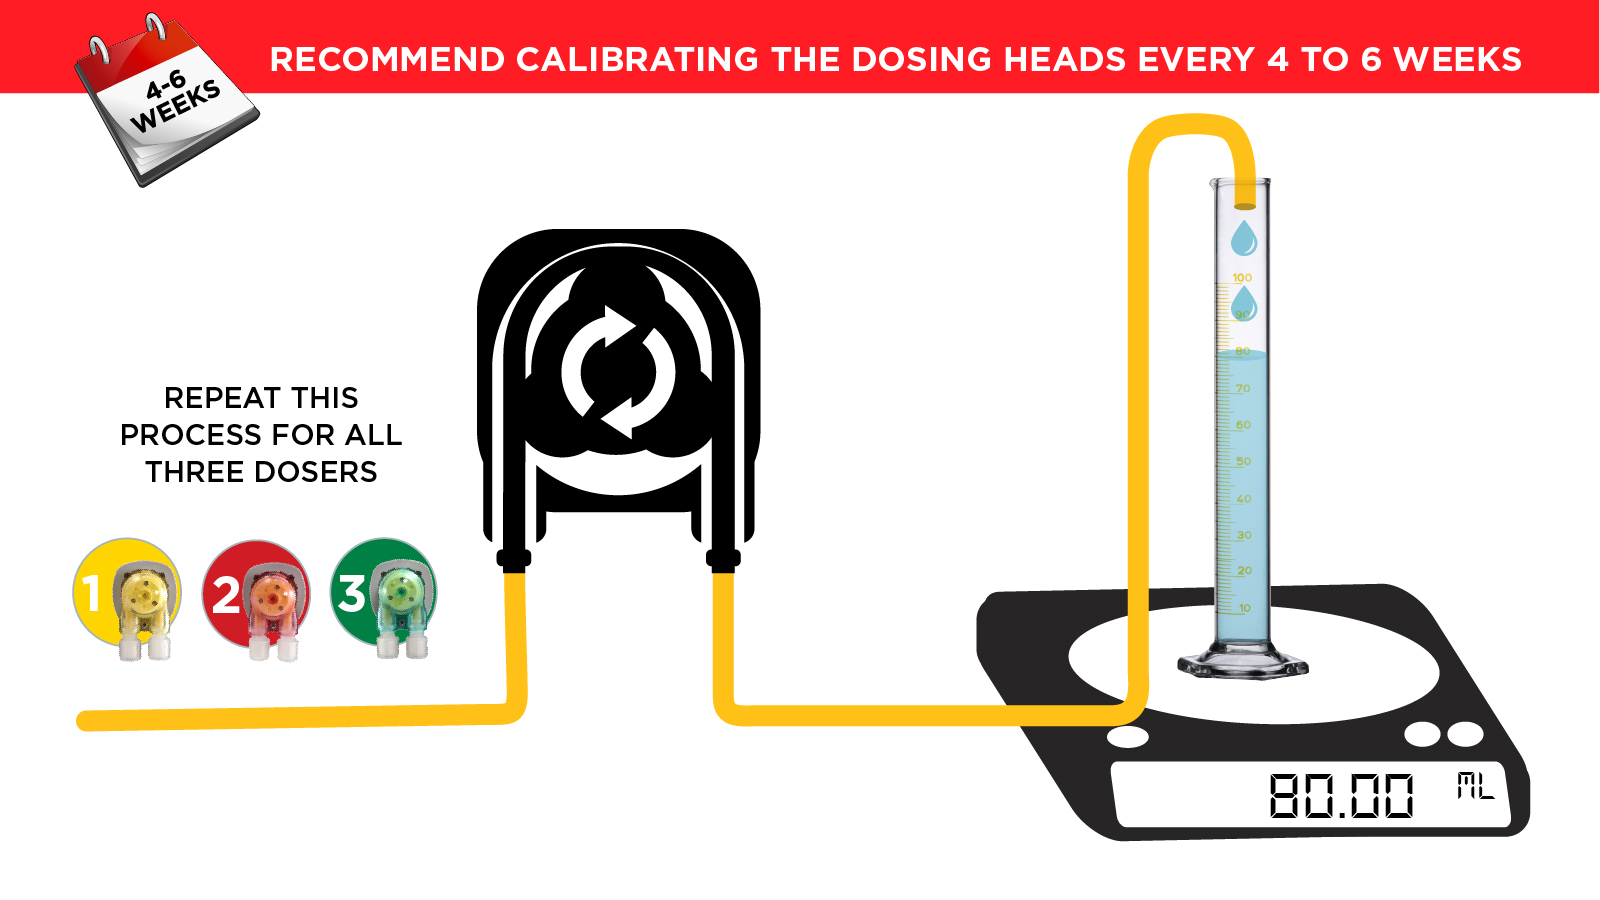
- Insert the primed doser output line into the measuring/calibrated beaker.
- Tap on the “Calibrate” button. It will trigger the HYDROS to run the doser for EXACTLY one minute.
- Remove the line from the beaker and read the volume inside. Enter this value on the HYDROS app.
- IMPORTANT: Upload your changes.
Repeat this process for all three dosers.
One-Time Manual Testing
Now and then, you will want to do an unscheduled Alkalinity test. Follow these steps:
- Go to the output section from the Status screen and tap on your iV Tester output.
- Tap on “Manual Test.”
Aborting a Running Test
If, for some reason, you need to cancel a running test, follow these steps:
- Go to the output section from the Status screen and tap on your iV Tester output.
- Tap on “Abort Test.”
- Unless you tap on “Resume Testing,” HYDROS will not resume scheduled testing.
TIP: Please note that when you see “Resume Testing,” it does not indicate that the previously aborted test will be continued. Unfortunately, the aborted test cannot be retrieved. However, it does mean that testing will begin again when the Testing Regimen Schedule calls for it.
Rename Output & Change Icon
- From the STATUS screen, tap on the Output you wish to modify.
- On the popup, tap on the “Gear” icon on the bottom right.
- From the Output setup page, tap on the “Pencil” icon on the top left.
- Type in the new name you wish
- If you wish to change the default icon, tap “Change Icon.”