In some cases, the temperature in the aquarium might go beyond the optimal range for our coral and fish residents, particularly in winter. Therefore, it is advisable to incorporate a heater to aid in maintaining the warmth of the tank.
Here is what you’ll need to get started:
- A heater is connected to a controllable outlet.
TIP: It is highly recommended to use a heater that has an integrated thermostat. By setting the thermostat to turn off at a temperature slightly higher than what you want for the tank, you can ensure that the heater will maintain the desired temperature even if the controller loses connection with the outlet. This redundancy will keep your tank inhabitants safe.
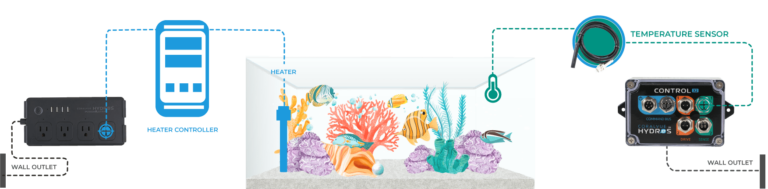
- Our system includes a temperature probe. You can use the same probe to monitor the tank’s water temperature.
TIP: If you still need to add the Temperature Sensor as an INPUT, please follow the instructions here [1].
Step 1: Create the Heater Output
- From the STATUS screen on your HYDROS app, top on the three horizontal dots to the right of the OUTPUTS label and select “Add / Edit Output.”
- Tap on the “+” symbol at the bottom right of the page
- Type in the name of your new output and then tap “Create.”
Step 2: Configure your Heater
- Family: Temperature Controls
- Type: Heater
- Turn ON At: This option allows you to select the highest point before the Control turns ON your Heater.
- Turn OFF At: This option allows you to select the lowest point before the Control turns OFF your Heater.
- Temperature Input 1: Select the first temperature sensor input.
TIP: To see a list of all inputs available on MULTIPLE devices, you must first create a Collective [2]. Otherwise, only inputs on the same device will show.WARNING: This input is required. If you leave this field blank, the output will automatically go into the “Fallback” state. - Temperature Input #2: Select the second temperature sensor input.
TIP: For added reliability, consider placing the second temperature sensor on a different controller device within a “collective” environment. This setup creates a safety net—if one temperature sensor happens to fail, your system can seamlessly keep operating with the backup sensor still in place!WARNING: If the temperature difference between the two inputs is more than 1C (1.8F), it will trigger an alarm. - Output Device: Here, you select the location of your heater.
- Power Safe Range: You can set a range for acceptable power usage. If the power consumption exceeds this range, you will receive a notification if you select this option.
WARNING: This option is NOT available if the “Output Device” is assigned to an outlet that cannot monitor power, such as a WiFi Strip outlet. - Power Notification Level: It allows you to select the notification level that triggers if the power consumption falls outside the “Power Safe Range.”
WARNING: This option is NOT available if the “Output Device” is assigned to an outlet that cannot monitor power, such as a WiFi Strip outlet. - If Input / Dependency Unavailable: It allows you to specify the state of the Output Location if one of the inputs or outputs it depends on is unavailable.
- Enable Advanced Settings: If you are an expert, you can customize the default output settings to suit your system better.
- If Input Unavailable: This allows you to specify how the outlet should act if the sensor is not found or is missing.
- Minimum OFF Time: Allows you to specify what is the minimum time the outlet should be OFF
- Maximum OFF Time: Allows you to specify what is the maximum time the outlet should be OFF
- Minimum ON Time: Allows you to specify what is the minimum time the outlet should be ON
- Maximum ON Time: Allows you to specify what is the maximum time the outlet should be ON
- Run Past Max ON time: This allows you to specify if you want the outlet to remain ON even if the “Max ON Time” has been exceeded.
- Notification Level: Allows you to specify the level of notification you want when any of the advanced settings have been exceeded
TIP: You will get notifications when one or more advanced settings have been exceeded. If you set the Notification Level to NONE, then the particular outlet you configured will not send you any notifications.
- Power Safe Range: You can set a range for acceptable power usage. If the power consumption exceeds this range, you will receive a notification if you select this option.
- Active Modes: This allows you to choose which modes this output will be active and in which modes the output should turn OFF
- Depends On: This feature allows you to turn the output based on the status of another output. To enable this, select it from the list of available outputs.
- Dependency Mode: You can turn the output ON or OFF based on the other output.
- OFF if OFF: Will turn the current output OFF if the output it depends on is OFF.
- OFF if ON: Will turn the current output OFF when the output it depends on is ON.
- ON if OFF: Will turn the current output ON when the output it depends on is OFF.
- ON if ON: Will turn the current output ON when the output it depends on is ON.
- Dependency Mode: You can turn the output ON or OFF based on the other output.
- Is Invisible: If you choose to hide the input from the status screen, it will only become visible on pages that have “Show Invisible” selected.
EXAMPLE: Here is an example of a heater setup where the HYDROS is the primary controller, and the heater’s thermostat acts as backup:
Heater’s Integrated Thermostat Setup:
- Set the heater’s integrated thermostat to 80 degrees.
HYDROS Controller Heater Output Setup:
- ON Temperature: 78.0
- OFF Temperature: 78.5
In this situation, the HYDROS controller manages the heater daily. It will activate the heater outlet when the tank’s temperature falls below 78 degrees and switch it off when it reaches 78.5 degrees. If the HYDROS temperature sensor malfunctions and the heater remains on, the built-in thermostat will deactivate it once the water temperature hits 80 degrees.
TIP: This setup also allows the HYDROS to monitor the power consumption of the outlet (if using a HYDROS-compatible device) and alert you when the heater is supposed to be on. Yet, HYDROS is not detecting any power draw on the outlet. This power monitoring feature is NOT possible if you use the integrated thermostat as the primary controller with the HYDROS as a backup.
Step 3: Save
- After configuring the output, tap the yellow bar at the bottom to upload your changes to the cloud and each HYDROS device.
Rename Output & Change Icon
- From the STATUS screen, tap on the Output you wish to modify.
- On the popup, tap on the “Gear” icon on the bottom right.
- From the Output setup page, tap on the “Pencil” icon on the top left.
- Type in the new name you wish
- If you wish to change the default icon, tap “Change Icon.”